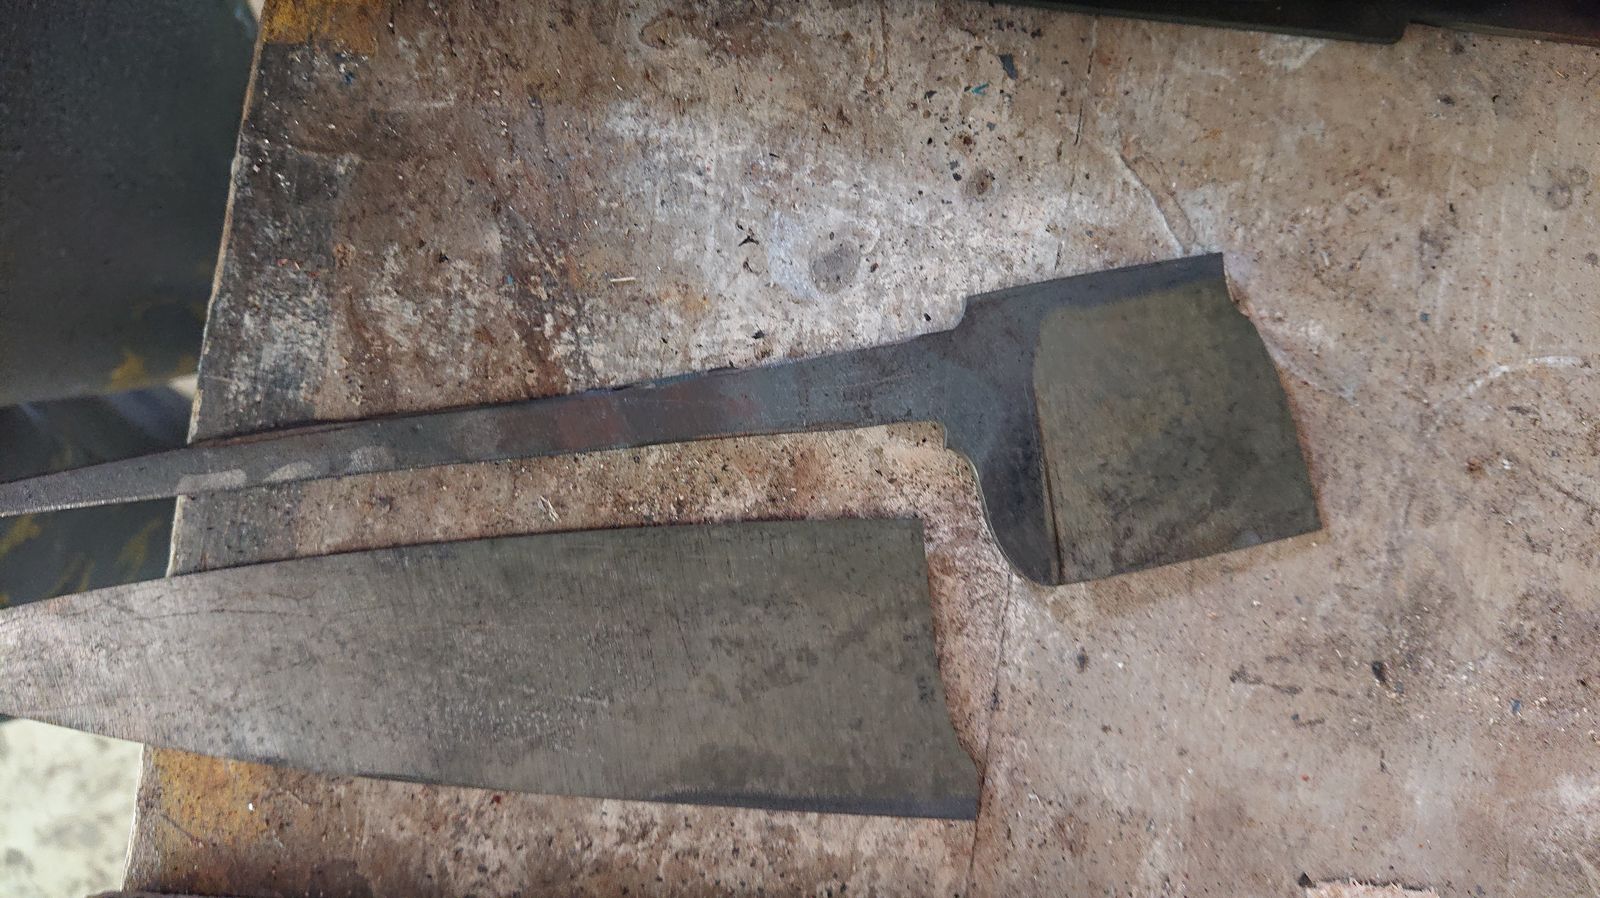
The last batch of knives did come out of quench straight-ish, but the tangs were a bit crooked on some blades. No biggie, he said. Those are not hardened, he said. Will be corrected in a jiffy, he said. And then he broke a blade in half because he was an idiot.
© Charly, all rights reserved. Click for full size
Still, I do not think the blade should have broken like this, it is tempered and I did not exert too much force. But maybe I did. Unfortunately, the tangs did partially harden on some blades, which is a major headache because I have to heat them up significantly in order to straighten them now. As my hardening experiment has shown, with this steel all that is supposed to be soft must not be heated above the 1050°C at any point in the process. Which, admittedly, I did not know for sure at the time of quenching these blades.
So what to do with this? I have spent nearly eighteen years being involved in quality control in one way or another, and I must say it is a great way to make enemies at all levels. Customers hate you for the crap your colleagues have produced, your colleagues hate you because you point out to them that they have produced crap and the management hates you because you cost them money (both when things go well as well when things go awry) without generating any profit whatsoever. And everybody expects you to tell them how they should solve the problems you found – despite that part being actually their job, with yours only being the pointing out of the problems.
Now I am my own quality control so at least now it really is my job to solve the occurring problems. For example, apart from this broken blade, one blade seemed to be softer near the tang. I have decided to continue work on it anyway and I established later on that it was only slight decarburization and the steel is sufficiently hard deeper under the surface. So far so good. But is there anything that can be done with this broken blade? Well, I surmised that yes, and I have decided to try some new things whilst doing it.
© Charly, all rights reserved. Click for full size
The broken-off tip was long enough for me to grind small (9 cm) blade out of it with enough steel left for a short hidden tang. I have simply cut it with an angle grinder to the desired shape and then thinned, formed, and polished the blade on the belt grinder. The notches on the tang are there to allow for the epoxy to grab onto.

© Charly, all rights reserved. Click for full size
I have made the handle from a piece of apple-root from a dead tree given to me by my neighbor. The bolster is from a coconut shell. The wood was partially rotten, so I have decided to try my hand at a new thing – stabilizing the wood with epoxy resin. And to utilize my resources meaningfully on this experiment, I went and cut some more wood, even more rotten, from a willow trunk that lay in the garden for years. It is full of holes, wood dust (AKA grub poop), fungal discolorations and it is extremely porous, it even crumbles in parts.

© Charly, all rights reserved. Click for full size
I do not have a compressor or a proper vacuum pump, and I was unwilling to spend any money on them at this stage, the resin itself was pricey enough. So I tried my best with things I already have at hand and I came up with this.

© Charly, all rights reserved. Click for full size
These are two huge thick-walled glass jars for canned fruit, with removable snap-on covers. They should withstand vacuum reasonably well. I have replaced the glass-covers with ones made from particleboard, with the joint and snap-on latch made from fencing wire around some screws.
The jar on the left has a ball-valve in the middle, with 6 mm tubing attached to it. The jar on the right has two 35 mm holes and one 6 mm hole in the middle. To the middle hole is attached the thin tube from the left jar, shop-vac is connected to one of the big holes and a swiveling cover is over the second hole.
I have given the knife with handle suspended in resin in the left jar. When the shop-vac was running with the ball-valve open and the big hole covered, it sucked air reasonably well out of both jars. But shop-vac cannot run with blocked intake for too long, thus the ball valve and the covered hole – after half a minute I could close the valve (keeping the low pressure for a few moments more), opened the big hole and left the shop-vac cool with flowing air for a minute or two. Then I have repeated this process as many times as it took until no bubbles were rising from the resin.
To get an estimate, I weighed the knife before and after, and it has gained about 20 g of weight (65 to 85 g), which seems reasonable, the wood was not extremely rotten, only slightly so. I have also weighed one of the willow pieces and the weight gain there was much more extreme – from ca 20g to 120 g. I have not cut the wood to see how deep the resin has penetrated, but it definitively penetrated deep enough to work on pre-formed handles, even if not on squared wood.
So this has confirmed that I can do this with the equipment I already have and that investing in some better equipment is thus warranted. Still, I am hesitant about spending 100,-€ or more on a vacuum pump, I hope I can mc-gyver something a lot cheaper. On Wednesday I am going shopping for parts. If I succeed, I will let you know.
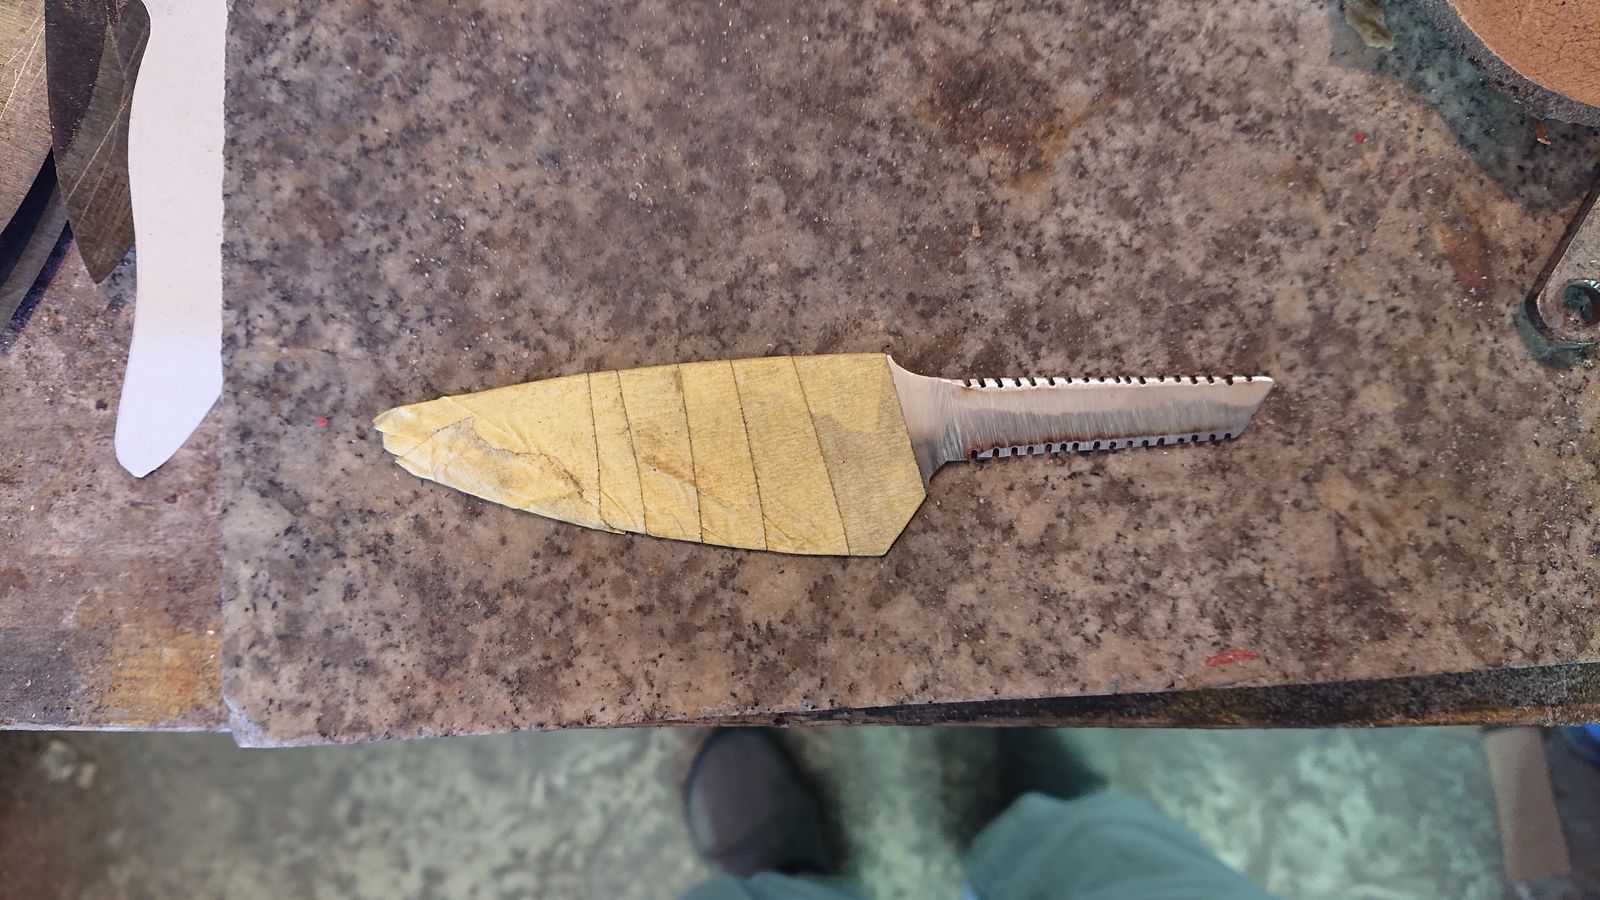
Oh, and here is the finished knife.

© Charly, all rights reserved. Click for full size
Overall length 20 cm, blade length 9 cm at the spine, 3,5 cm wide, satin finish (trizact A100). The handle was polished to 1200 grit and buffed with beeswax.
I have given the knife to my neighbor because she has refused payment for the dead tree and I think she should get something for such beautiful wood. She did not object this time and I hope it will serve her well.
That is a gorgeous save!
And I’m looking forward to seeing how the resin soaked willow performs.
I’m very sure your neighbour will be very happy with the knife. It looks like a great kitchen knife for all the small cutting in the kitchen.
I guess the jars should be OK. I uae clear PVC pipe that’s 1/2″ thick and 4″ diameter, solvent welded to two layers of 1/4″ ABS plastic. Glass is fearful stuff to me, I’ve dug enough out of various parts of me.
When you pressure test them you might want to wrap them in a towel the first time. Towels are great shock absorbers and they’re good for first aid too.
Nice save! Good Luck with the McGyvering.