Kestrel has decided to enter a painting competition for a micro mini model horse and she’s bringing us along on the journey.
There is a novice model horse painter contest coming up and I want to enter. The contest is specifically for the category of “micro mini” resin model horses – this is 1/64 of live size, and these little horses are made by a sculptor who then either casts or 3D prints them, depending on who is producing them. I’ve painted only 4 of these micro minis and I’m going out on a limb here – this horse is not done, so I have no idea at this point how he will turn out. I need to hurry though – entries close the last day of March!
©kestrel, all rights reserved
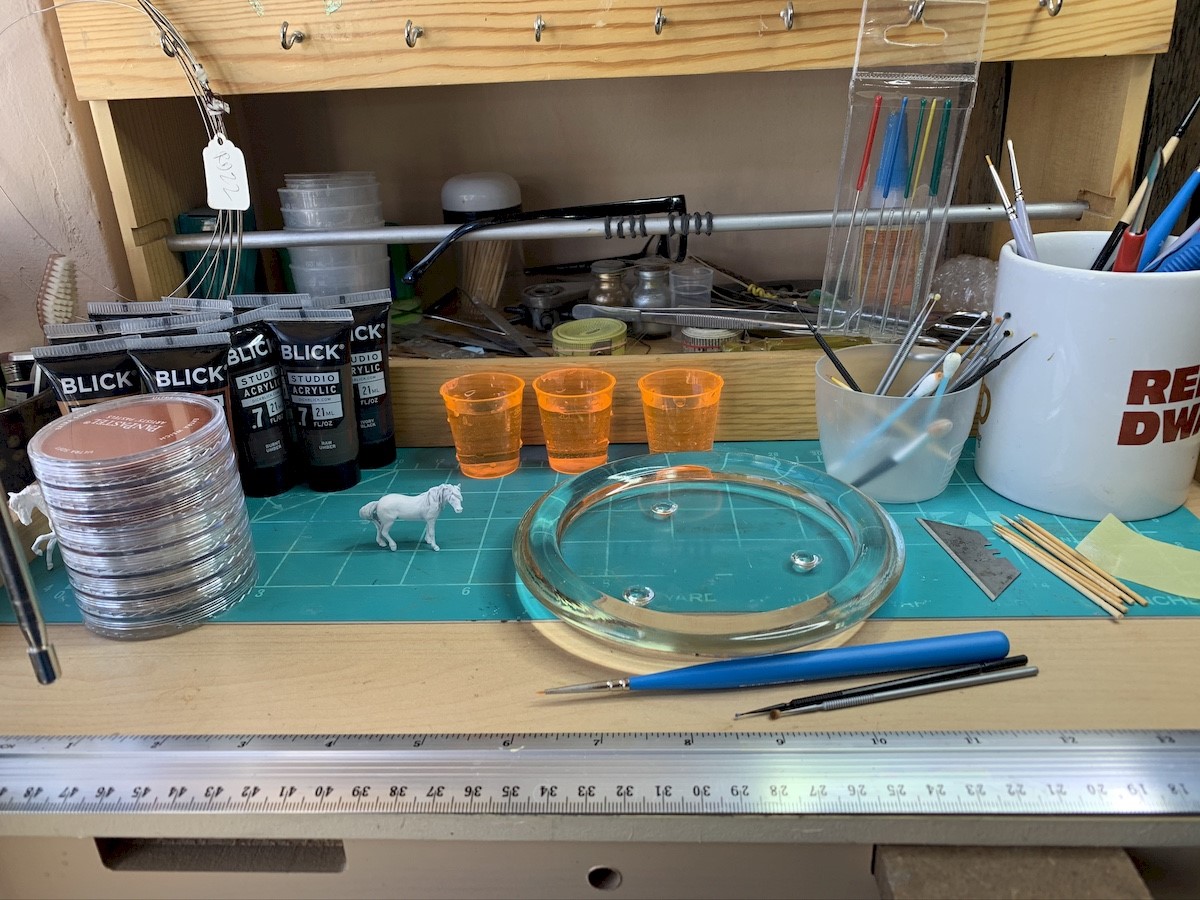
Here is my painting area cleaned up and ready. I have pastels, acrylic paints, the model I’ll paint, some water, my glass palette, various brushes, a tiny piece of flexible sanding paper, a blade to clean the palette and toothpicks, which I use the way some would use a palette knife.

©kestrel, all rights reserved
Now for safety! People are supposed to breathe air, not pastel dust or paint fumes, so here is my respirator and a pair of gloves. I also wear a visor on my head that goes down over my eyes, and glasses under all that. Hopefully no one comes to the door while I’m so accoutered… The model has to be scrubbed down with something like Comet. Paint won’t stick to finger prints, grease, or dirt, so from now on I won’t touch this model with my bare hands, I’ll always be wearing gloves until I put the final finish on him.

©kestrel, all rights reserved
My model is already “prepped and primed”. The little donkey resin is not; he has holes and flaws in the casting, seams and rough areas, and all of that has to be filled in, filed down and fixed so that he has a perfectly smooth surface for painting. After the prepping, I spray the model with primer, in this case I used white primer.

©kestrel, all rights reserved
I’m using this horse as my reference for how the markings will look on the finished model, although I’ll paint the marking as she is in the summer, all shed out and slicked off, not all hairy and dirty like she is here in the spring. Fortunately she lives right here at my house, so if I get stuck on how exactly a marking goes, or the right color, I can just go outside and look. (Plus I have about a million pictures of this little horse on my computer!) It’s very important to use a reference photo or photos. People show these models, once they’re finished, and the judges know very well how a horse should look. If I just made something up, I might accidentally put markings on a horse that are genetically impossible, and that would get marked down in the show ring.
I can’t take photos while I’m painting, so just imagine me putting the first layer of pastel on the model.

©kestrel, all rights reserved
Now I go to my spray booth, to put a layer of fixative on that first layer of pastel paint. The spray booth has a super powerful motor that pulls air through the filter, up through the hose on top and out the window. That way I don’t have paint all over inside the house, there are no fumes inside the house, and I can paint even when it’s cold or snowing/raining outside. The reason the model is on a piece of tape is because these tiny little things don’t weigh much at all, and as gently as I puff the fixative on the model, it will blow right over, possibly messing up the paint I’ve so painstakingly applied. You can see the white primer I used on the filter of the spray booth. I truly am a novice painter; this will be the 5th model horse I’ve ever painted, and that spray booth is brand new.

©kestrel, all rights reserved
This is amazing.
I never had the hand or nerves for painting and this one looks too cute. Also workspace envy.
That looks great, I am looking forward to seeing how it goes.
Good Luck with the competition, kestrel. You must have nerves of steel.
I use the same little diamond rasps; they are great.
Red Dwarf mug!
You’re so patient and controlled. /salute
Thanks everybody! He is coming along well so far. Of course I could still mess him up but so far it’s OK.
I’m lucky in my workspace. There is just the two of us so I can take over various parts of the house for things.
@Marcus well spotted! Yes indeed a Red Dwarf mug.