Click for full size.
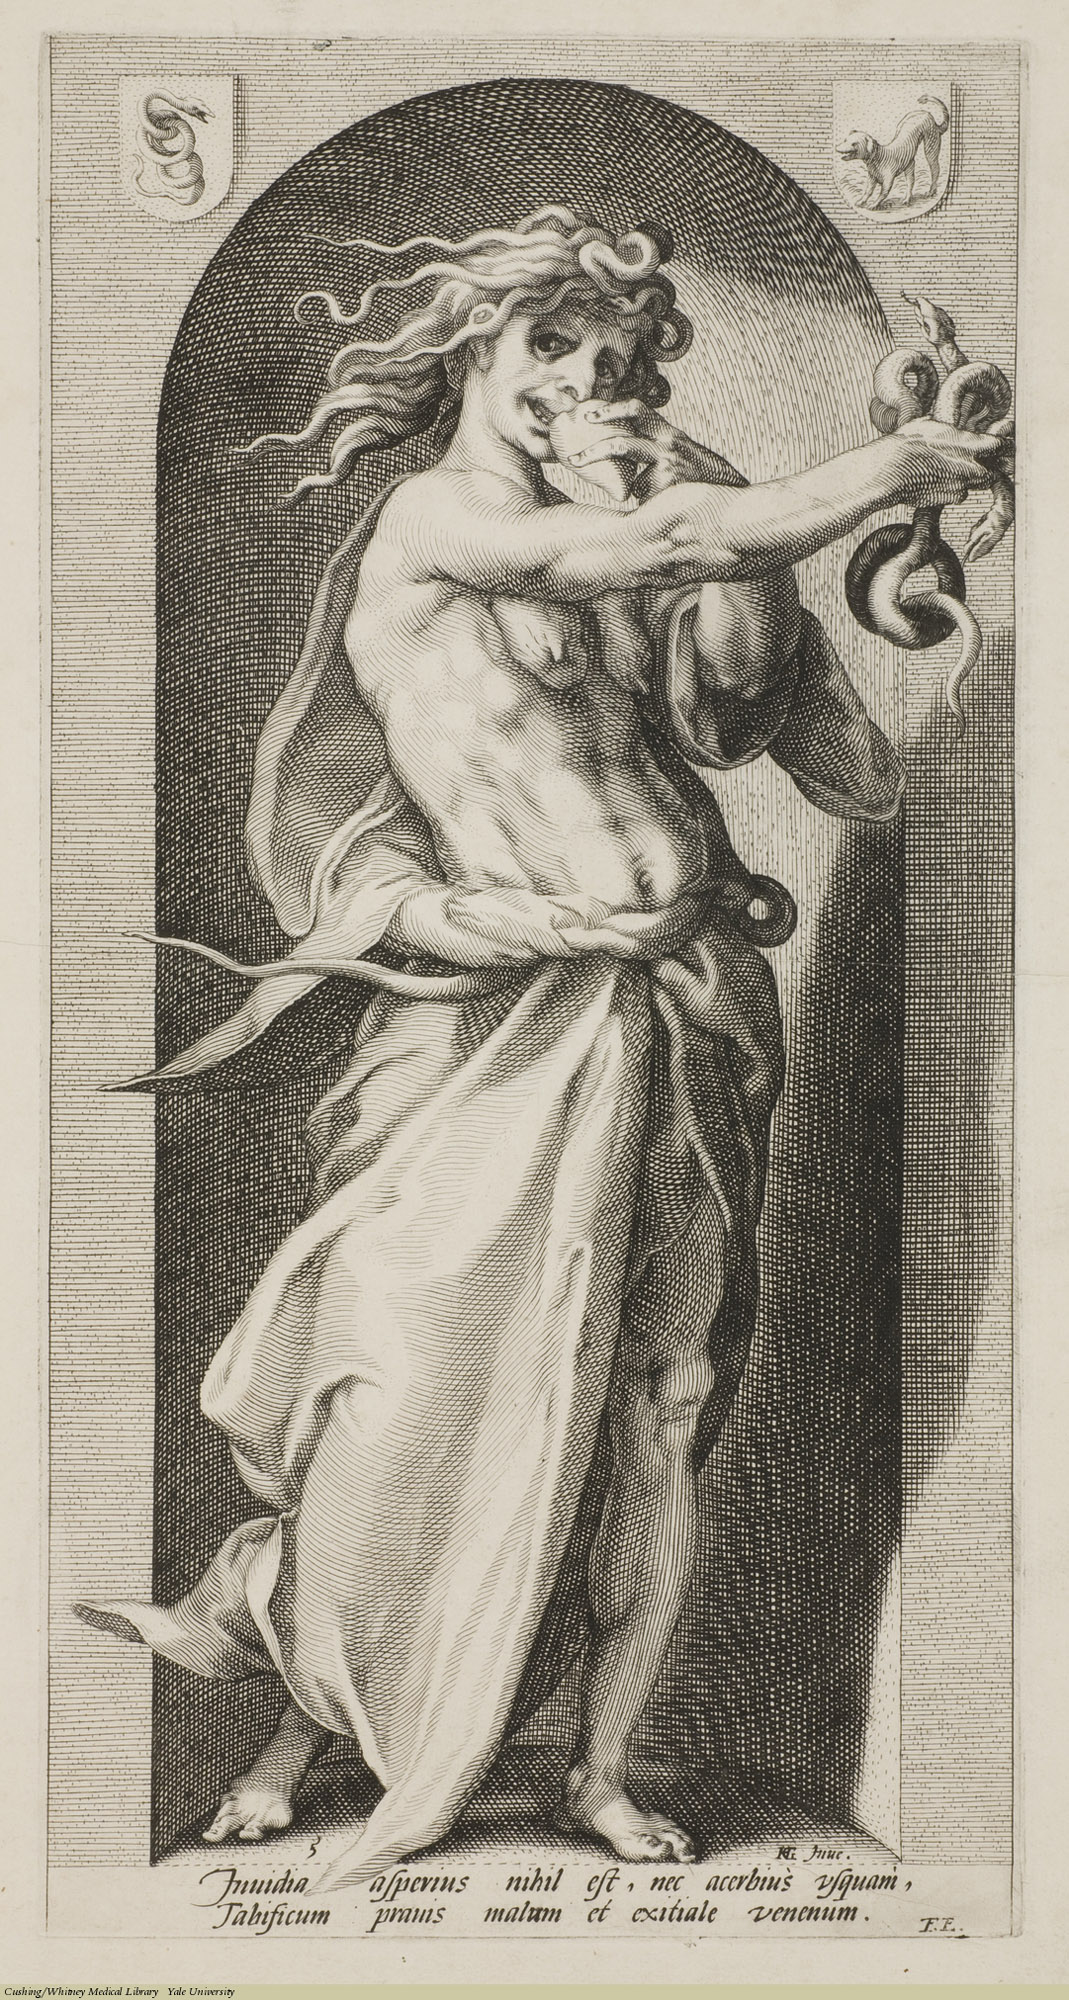
Envy. Hendrick Goltzius, Engraving, 1593. Subject: The Seven Vices, Envy, Psychology.
Click for full size.
Envy. Hendrick Goltzius, Engraving, 1593. Subject: The Seven Vices, Envy, Psychology.
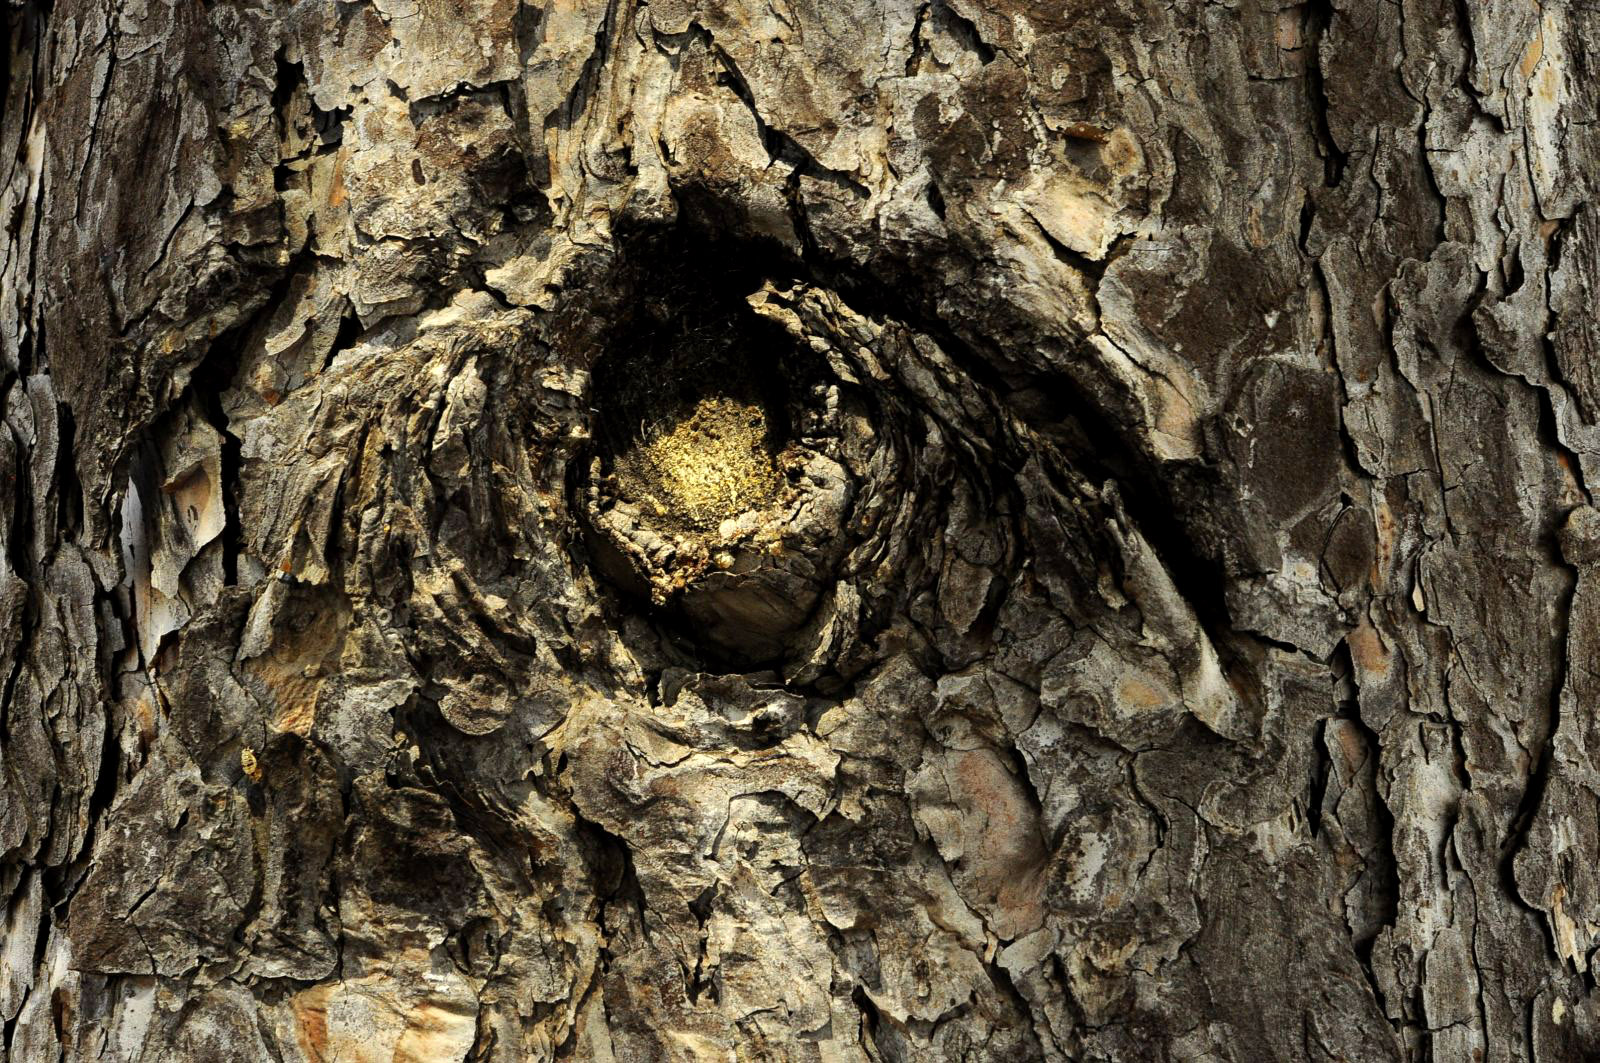
This week we have a majestic Ponderosa Pine in Bismark, North Dakota sent to us by the master of Affinity, Caine. It’s an intimate portrait of a big tree with big personality and it’s a fine addition to our catalog.
Thanks Caine.
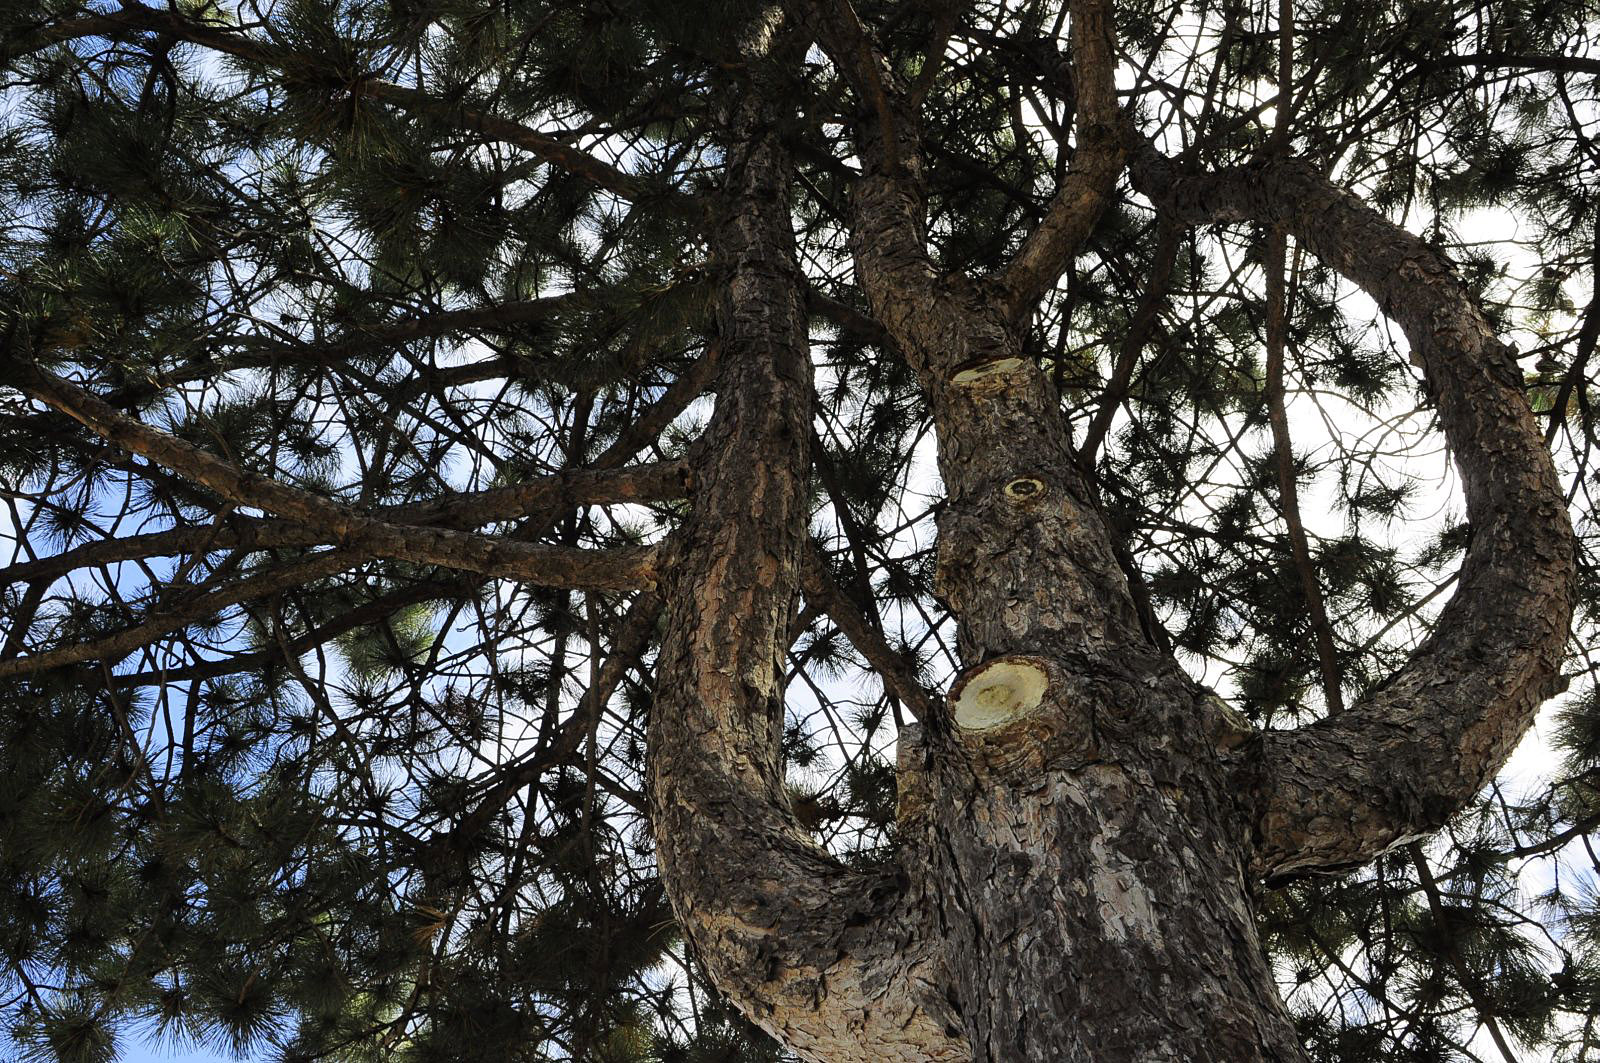
Ponderosa Pine, © Caine, all rights reserved
Ponderosa Pine, © Caine, all rights reserved

Ponderosa Pine, © Caine, all rights reserved

Ponderosa Pine, © Caine, all rights reserved
Legs. We have two of them to carry us around, and their musculature is very complex. This is due to the fact that despite appearances, only one joint – the knee – is (almost) simple flexing joint with one degree of freedom. Hip joints and ankles both have three degrees of freedom and therefore require accordingly complicated musculature to use them.
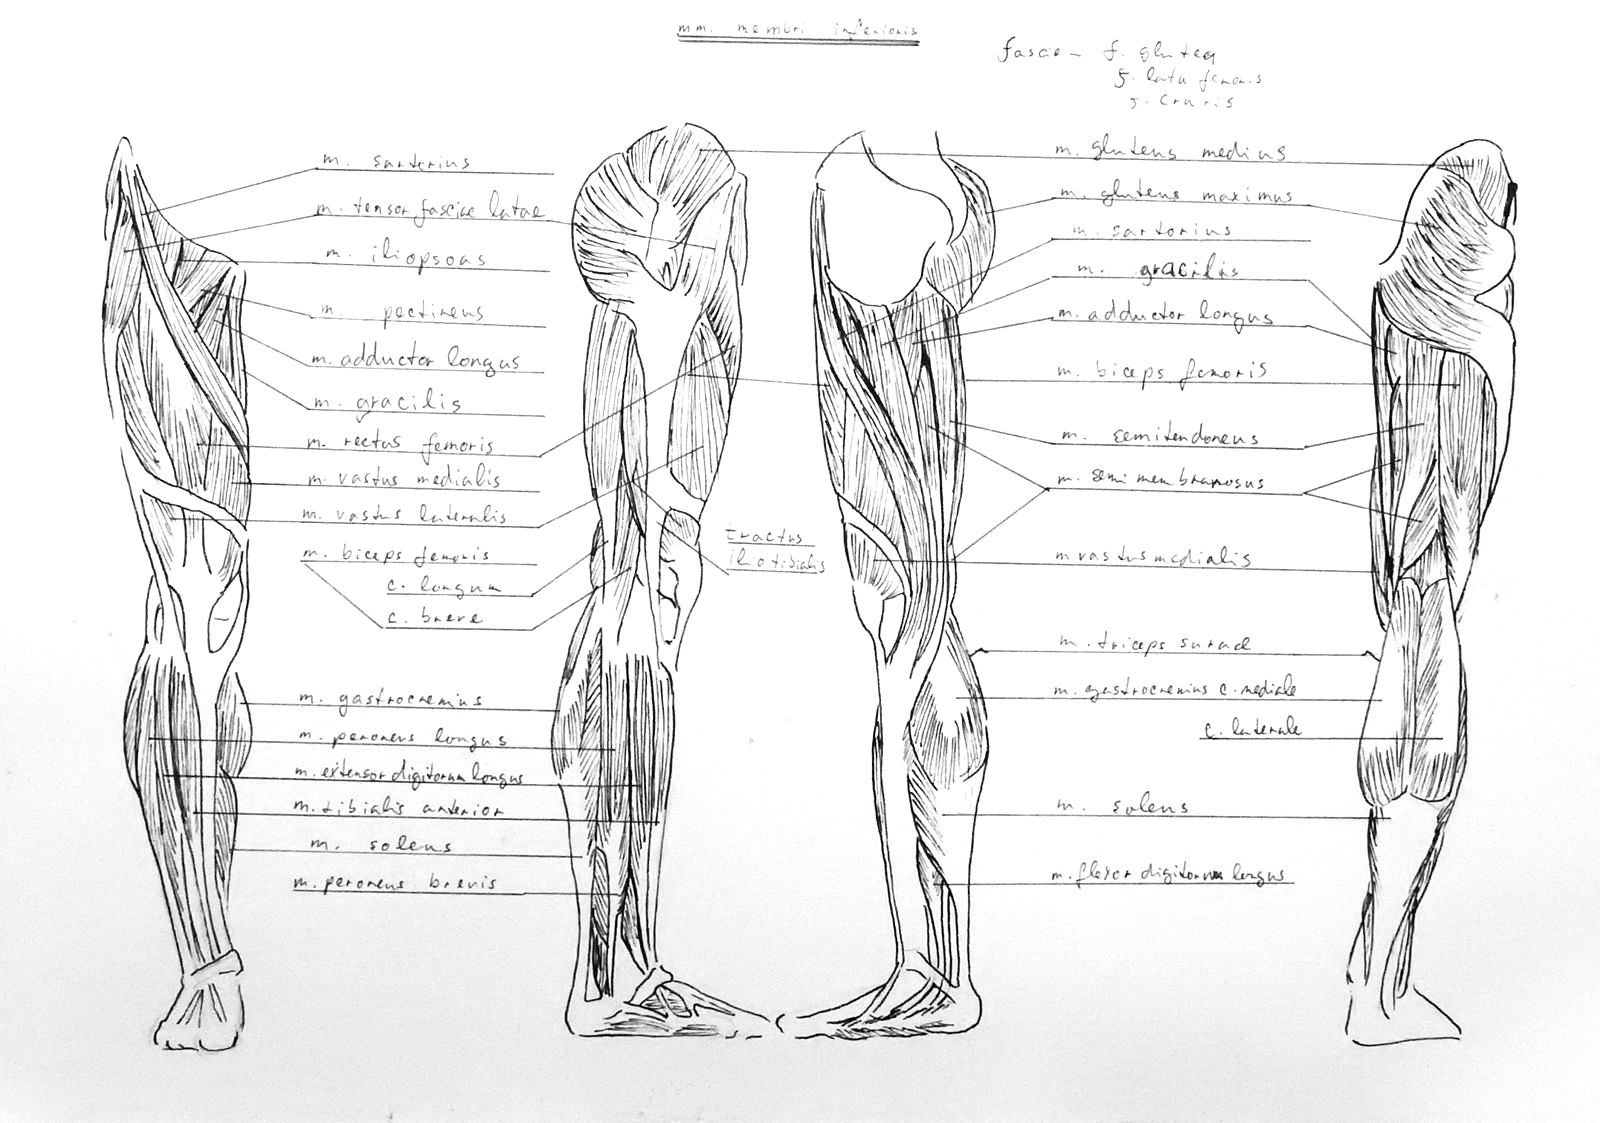
©Charly, all rights reserved. Click for full size.
Legs also have the biggest and strongest muscle in the human body – the musculus gluteus maximus. It has to be big and strong, because it is the main source of propulsion, the other muscles being more responsible for keeping balance and maneuvering.
Professor Kos remarked, in a slightly yet not entirely creepy way, how working of this muscle can be minutely observed with ease in modern times due to the fashion of young women wearing tight jeans. I admit that I like to observe the changes in curvature of such working musculus gluteus maximus, and from what I gather not only am I not alone in this, but it is not exclusive to my gender either.
However I am also aware that it is rude to stare at someone’s ass – and from what I gather ignorance of this unfortunately is almost exclusive to my gender, as demonstrated by a respectable elderly professor talking about oggling asses with lecherous grin to a bunch of students half of whom were young women quarter his age.
To stay in line with my current series, this daily bird is one of the many bird shoots from the camp site. The stable of the mini farm is home to a colony of barn swallows, which constantly frustrated me in my attempts to take pictures.
They would mostly circle the vicinity of the farm during the day, but in the evening, when the pool was closed, they would come for a drink, despite the water being slightly salty. Sorry for the poor quality. The light was low, the birds were fast and the big lense starts at a 5.6 shutter, so the ISO was pretty high.

More serial shoots below the fold
Camp sites are interesting social spaces, because for a short while they throw people together who then all have to get along with each other. For adults that may be stressful, for kids that often means new friends. Subsequently you get to know their parents and often you find out that just like the kids, you can easily pass some time with total strangers and amuse yourself over a glass of wine.

There’s nothing like ice cream. It’s not that I was unable to take a proper pic, it’s just that I don’t want to publish recognisable images of children, especially not other people’s children. ©Giliell, all rights reserved
Funny enough, this was the second time at this specific camp site that the kid and parents were on a several months long journey through parts of Europe following the birth of a child. I don’t know if this is becoming a new trend with middle class families with one main breadwinner who then takes the paid parental leave and then they all take off together.
I’m not going to have another child to find out.
Last night I was sitting behind the house with some friends, when I heard a “plonk” where no plonk should be. I looked and found the biggest caterpillar I’d ever seen. It had crawled up a grass stalk but then gravity happened and it ended up on the terrace.
Turns out it’s the mature form of the Elephant Hawk Moth which are indeed about 8 cm (3″ and a bit) long. After taking the pictures I took the hapless traveller and put it some place with more green.

Elephant Hawk Moth in training. ©Giliell,all rights reserved.

Elephant Hawk Moth in training. ©Giliell,all rights reserved.

Elephant Hawk Moth in training. © Giliell, all rights reserved.

Elephant Hawk Moth in training. © Giliell, all rights reserved.

An untaken path, ©voyager, all rights reserved
This path branches off from one of the main dirt trails that Jack and I use along the Thames River. It always looks inviting, but so far we haven’t explored it because Jack is allergic to grass. He might be just fine with it because, frankly, it looks like more weeds than grass, but I don’t want to take the chance just to satisfy my own curiosity. Maybe some day I’ll come without Jack and scope it out. I have so many questions.
Click for full size.
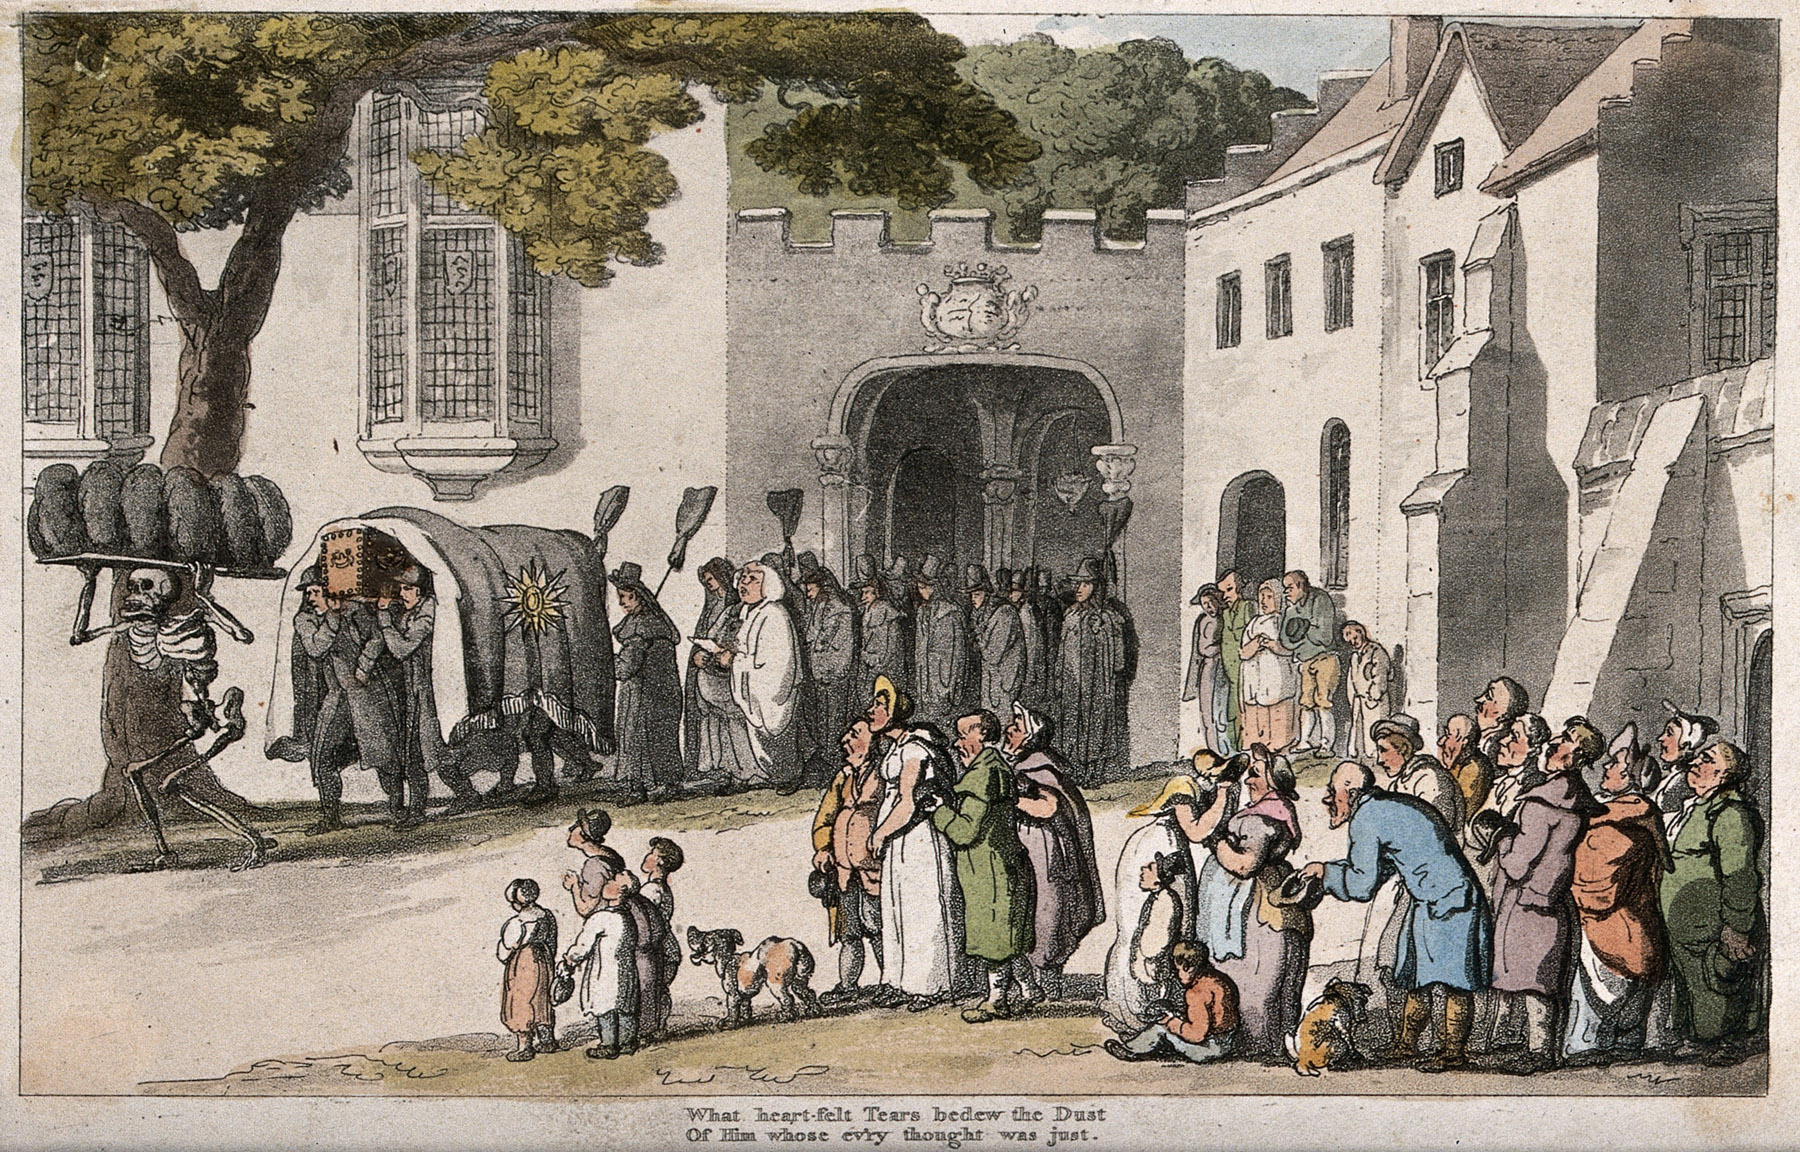
What heart-felt Tears bedew the Dust Of Him whose ev’ry thought was just.
Click for full size.

La Medecine pour tout le Monde (Ou conseils higieniques.) Anonymous, 19th Century. Subject: Medicine for Everyone, Hygiene, Humour.
So whilst I am coating the dagger handle, scratching it with 600 grit paper and giving it each day a slight buff with acetone diluted linseed oil, I can continue to work on the scabbard. It will take a few weeks for the linseed oil to harden really properly, so there is no rush. However some of the works shown here were done in parallel with works already shown.
 First thing to do is to properly shape the scabbard, leaving only about 1 mm thickness. Because the poplar wood that I have used is extremely soft, I was afraid to cut it for fear of taking away too much material. The most important rule in woodwork is – you can always cut, but you cannot ad. So I did not use chisels or a rasp, just an 80 grit sandpaper on a padded sanding block. My sanding block is a piece of wood with old carpet glued on the faces, and I am spanning on it endless belts that I used for my now dead small belt grinder. A wine cork is an excellent spanning device, allowing for quick change of belts and giving me the option of slack belt as well. When sanding around the throat of the scabbard I took care for the throat always face downward, so no loose grains fall into the scabbard and ruin the blade.
 Next thing that I have done was to soak the whole surface with hot hide glue, priming it so other materials can be glued on. After the hide glue has dried, I have covered the scabbard with linen, which I have again thoroughly soaked in hot hide glue. I do not know whether this was actually done for scabbards (although from some of the images that Caine has posted it seems plausible), but I know for sure that the technique was known from early medieval times through to the modern times. Covering wood in fabric soaked in hide glue is very effective way to prevent the wood from splitting and twisting. Firstly it adds fibers that are perpendicular to those of the wood, secondly hide glue shrinks significantly as it dries, effectively pressing everything tightly together. This is one area where real hide glue has an irrefutable advantage over any modern glue. After the hide glue has dried up, I have again sanded the whole thing with 180 grit sandpaper to smoothen all knots and irregularities in the fabric.
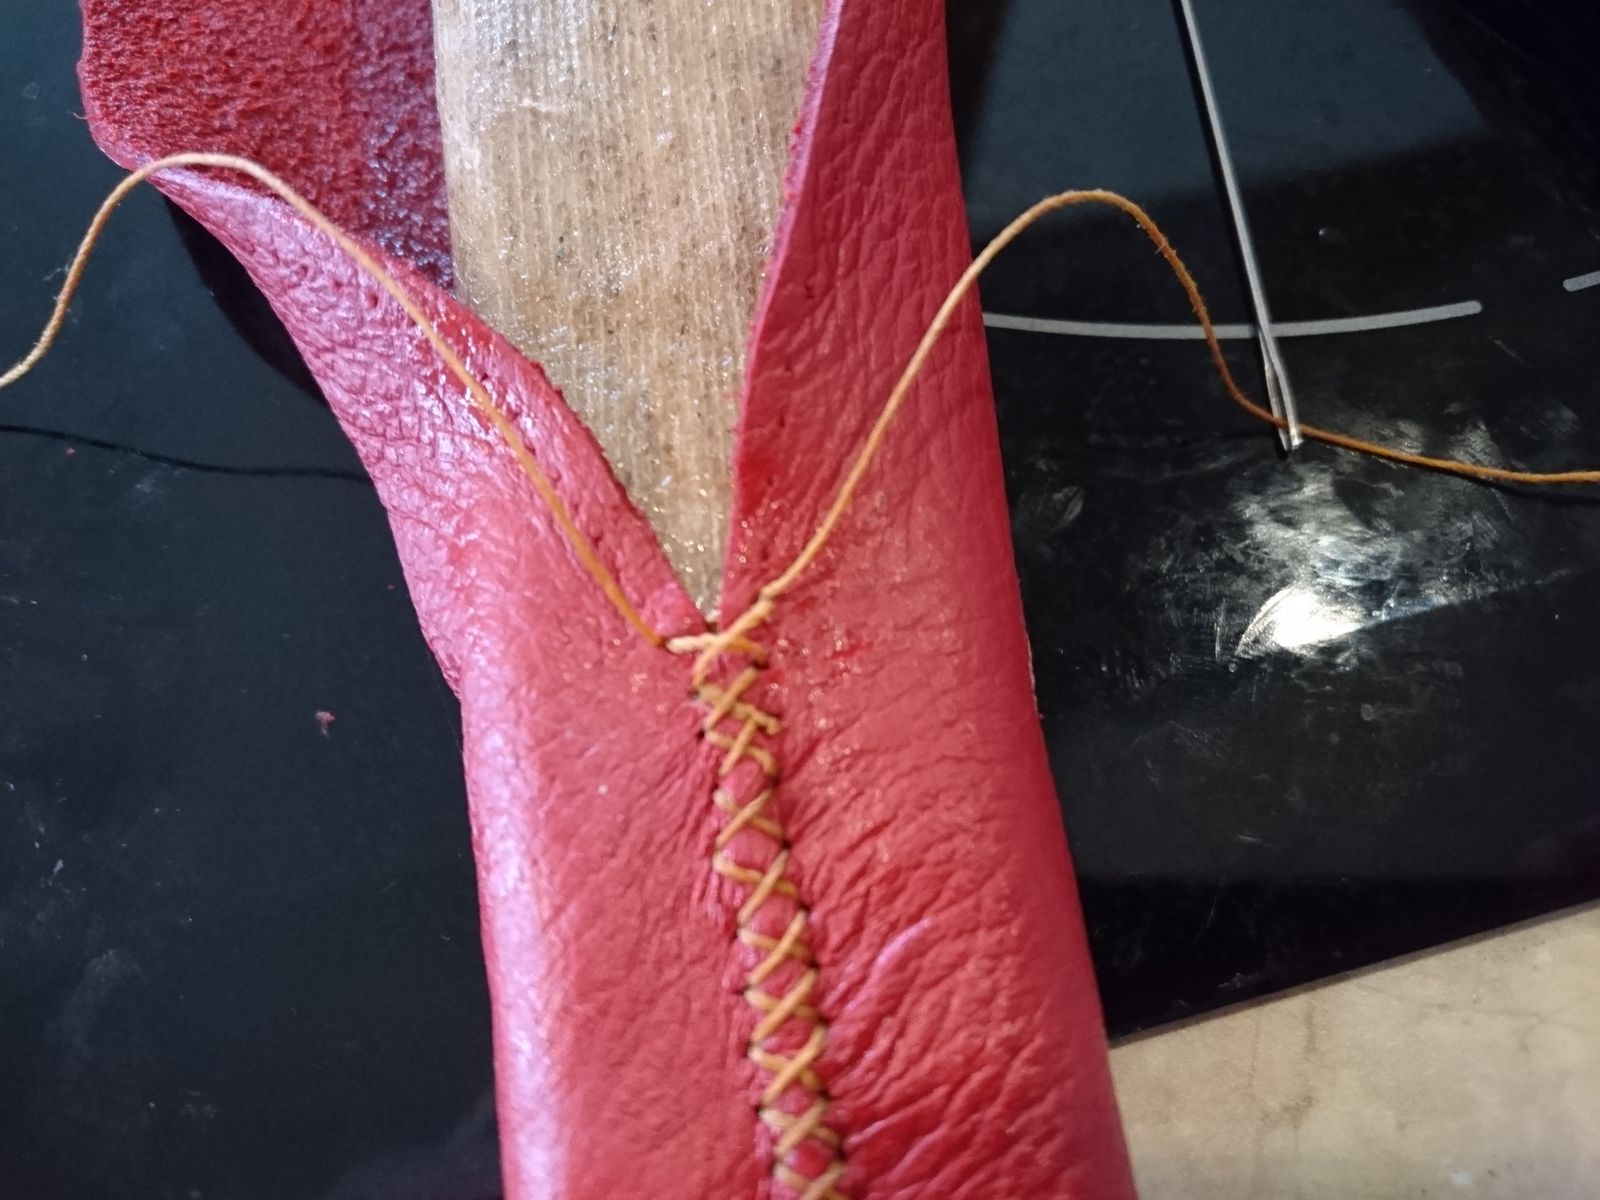
 To remain true to the game, I should use plain vegetable tanned leather, but this is one of the instances where I deliberately choose to stray away from my template and do something differently. For years I have a piece of dashing red leather that I wished to use for this project from the very beginning. It was of very irregular shape, but I was able to cut a piece big enough to cover the whole wooden scabbard from tip to throat. First I have cut a rough rectangle and then I continued to cut away tiny strips here and there until I had a piece that could be wrapped tightly around the scabbard with just about 1 mm space between the edges.
 Then I had to make holes for stitching. This is fairly thin leather, so I had to make the holes very close to each other for fine stitching. I have made leather sheaths before, but I have never done this, so I did not know how exactly spaced the holes should be. I reasoned that about two-three times the thickness of the leather space between the holes and from the edge should be about right in order to be able to sew the edges together tightly without the leather ripping.
I could not find my awl, it seems that I have lost it. Luckily I had this super old knife whose blade was almost completely eaten away that could be quickly modified for the task of pokey-holey. About 200 holes. Oh boy.
 For sewing I was going to use thick thread that is used for sewing jeans. For thicker leather I would have used thick linen thread, but that was a bit too thick for this job. Other threads we had at home on the other hand were too thin.
Before sewing, I have soaked the leather in lukewarm water (about 37 °C) for an hour so it becomes more stretchy and pliable. And I prepared the thread with the use of the unseemly mixture you see on the picture to the right. That mixture was made by boiling pine resin and beeswax and it was used by medieval shoemakers and saddlers to coat the thread before sewing. What are the advantages of that, you ask? Well it makes the thread bugger to work with as it becomes all sticky and latches onto everything – hair, pants, fingers, itself… Oh sorry, you asked about advantages. The thread does not split or fray during work, it is firmer and sleeker, despite the stickiness. If I coated the thread in advance and let it dry for some time It would not even be tacky, but I forgot about that. And I did not know how much thread I will need – it transpired that about ten times the length of the scabbard is about right.
 When the leather was all soaked, I have prepared a small batch of hide glue again and started covering the scabbard. First I have sewn together the tip and about 1 cm of the length. Then I painted that part and the whole face of the scabbard with hide glue and inserted it in the leather pocket and started sewing and adding hide glue all round for each sewn piece. I have used a two-needle technique that I have found on the internet. It has the advantage of pulling the edges together very regularly and equally on both sides, so it does not warp and zig-zag as it could had I used just one thread. I must be honest with you – my needle work leaves a lot to be desired. I was doing my best, but I was losing the holes in this very thin leather and I skipped a few here and there without wanting to. It took me two hours to sew the whole scabbard – about 100 stitches on 27 cm length. My back ached and I was happy when it was over.
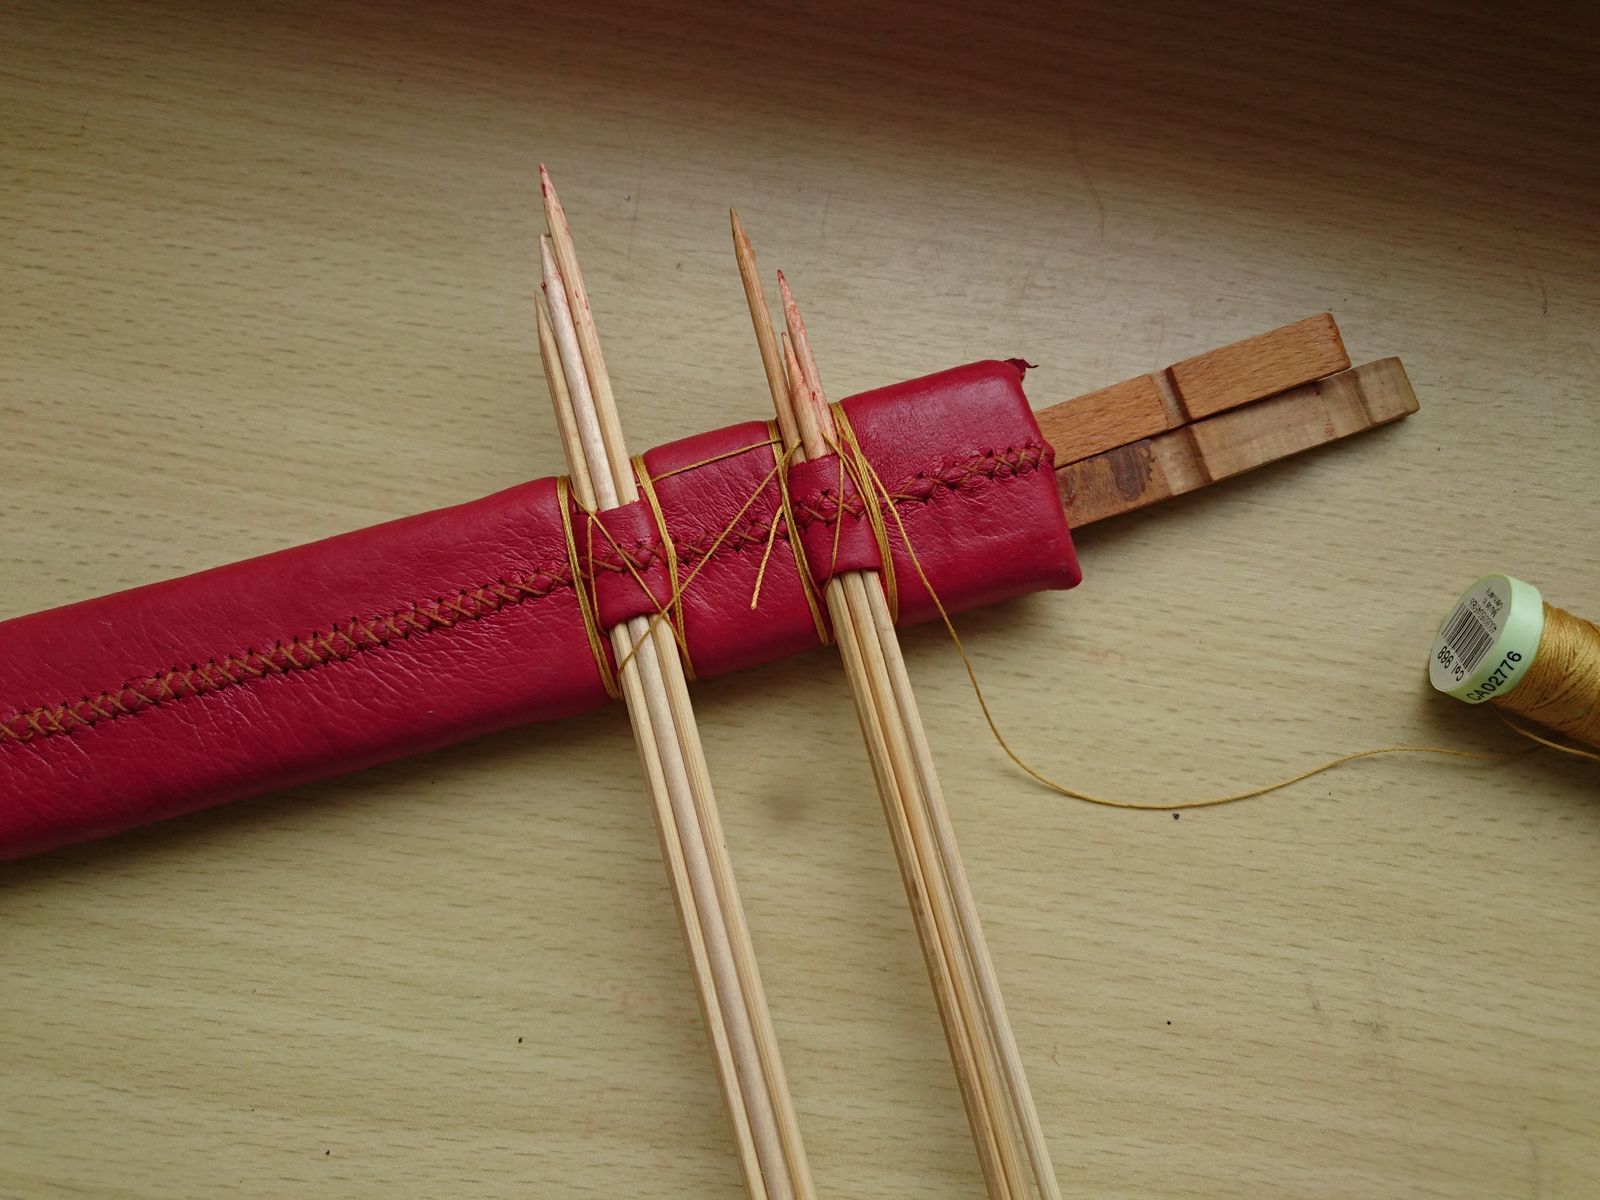 Last step was to poke and wrap holes for the straps. For these I have simply cut holes with a scalpel and inserted in the wet leather three skewers. The thread wrapped around will make visible grooves when it all dries up. If I wanted to, at this point I would also stamp and press the leather to decorate it. But I did not want to bite more than I can chew, for this project plain leather will have to do. I also formed the leather around the throat a bit, although I will have to get back at it once more – when it dries, I will have to cut all excess, wet it again with hot hide glue and form it better.
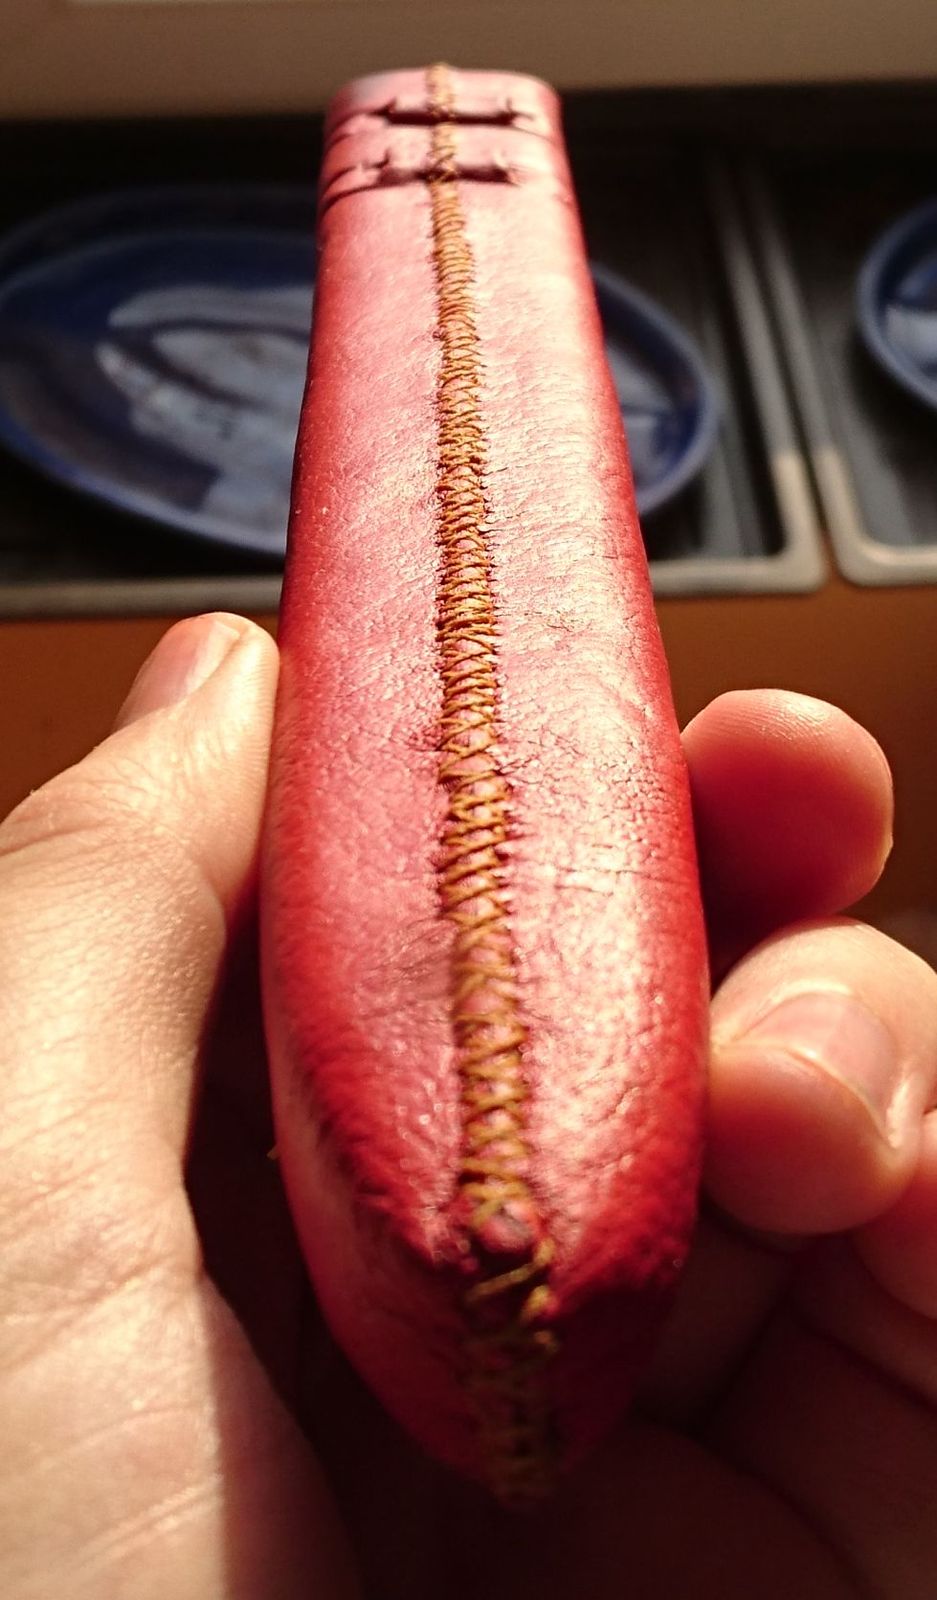 The scabbard is now nearly done, but the most challenging part is yet to come – I want to make metal chape and throating. And that is something I have never done and I will have to be really, really careful to not botch that up. And also think hard about how to do it, before I go cutting, bending, banging and soldering metal pieces together.
More about that next time. In the meantime you can admire my irregular stitches.
As I mentioned before, the camp site used to be a piece of farming land, and they still keep some animals that reflect the place’s history. It has a “public” meadow where visitors can see them and a “private” meadow where the animals can go if they want their privacy. We were lucky to be next to the private part. The management offers you to switch places if you don’t like the animal noises, but I quite enjoyed the chickens (no rooster, though), the sound of the goats and the occasional braying of the donkey.
Once a week the children can enter the meadow for an hour, but it is also ok to feed them appropriate snacks through the fence.

Pitufo (Smurf), the donkey. His companion is a mule and he quite like scritches behind the ears.

Isn’t he a beauty?
In case you’re wondering about the leather strips in front of his eyes, they keep the nasty flies away.