Project Phoenix – Part 3 – Beginning the Work

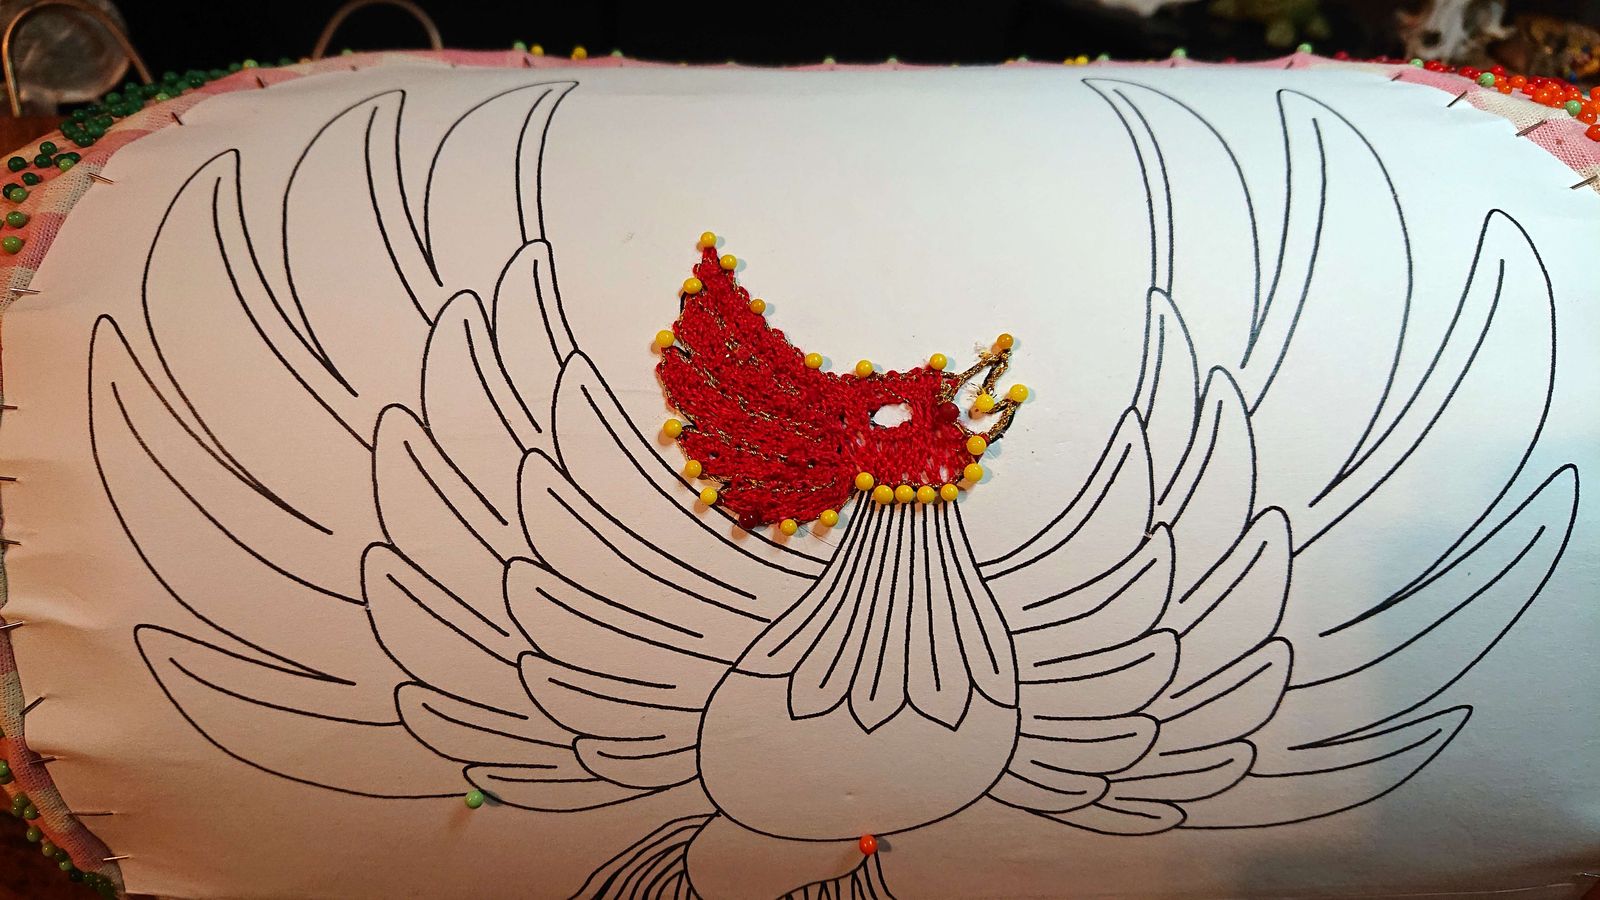
I printed the outline on two A4 sheets, glued it onto a thicker paper and pinned it onto the lace pillow (I think that’s how its called in Eenglush).

© Charly, all rights reserved. Click for full size

I started with the head and immediately made a mistake despite checking the sketch several times before starting. The head was supposed to be orange, not red. But it is red now, I am not starting all over – I only noticed the mistake today when the neck and body are finished too.

© Charly, all rights reserved. Click for full size

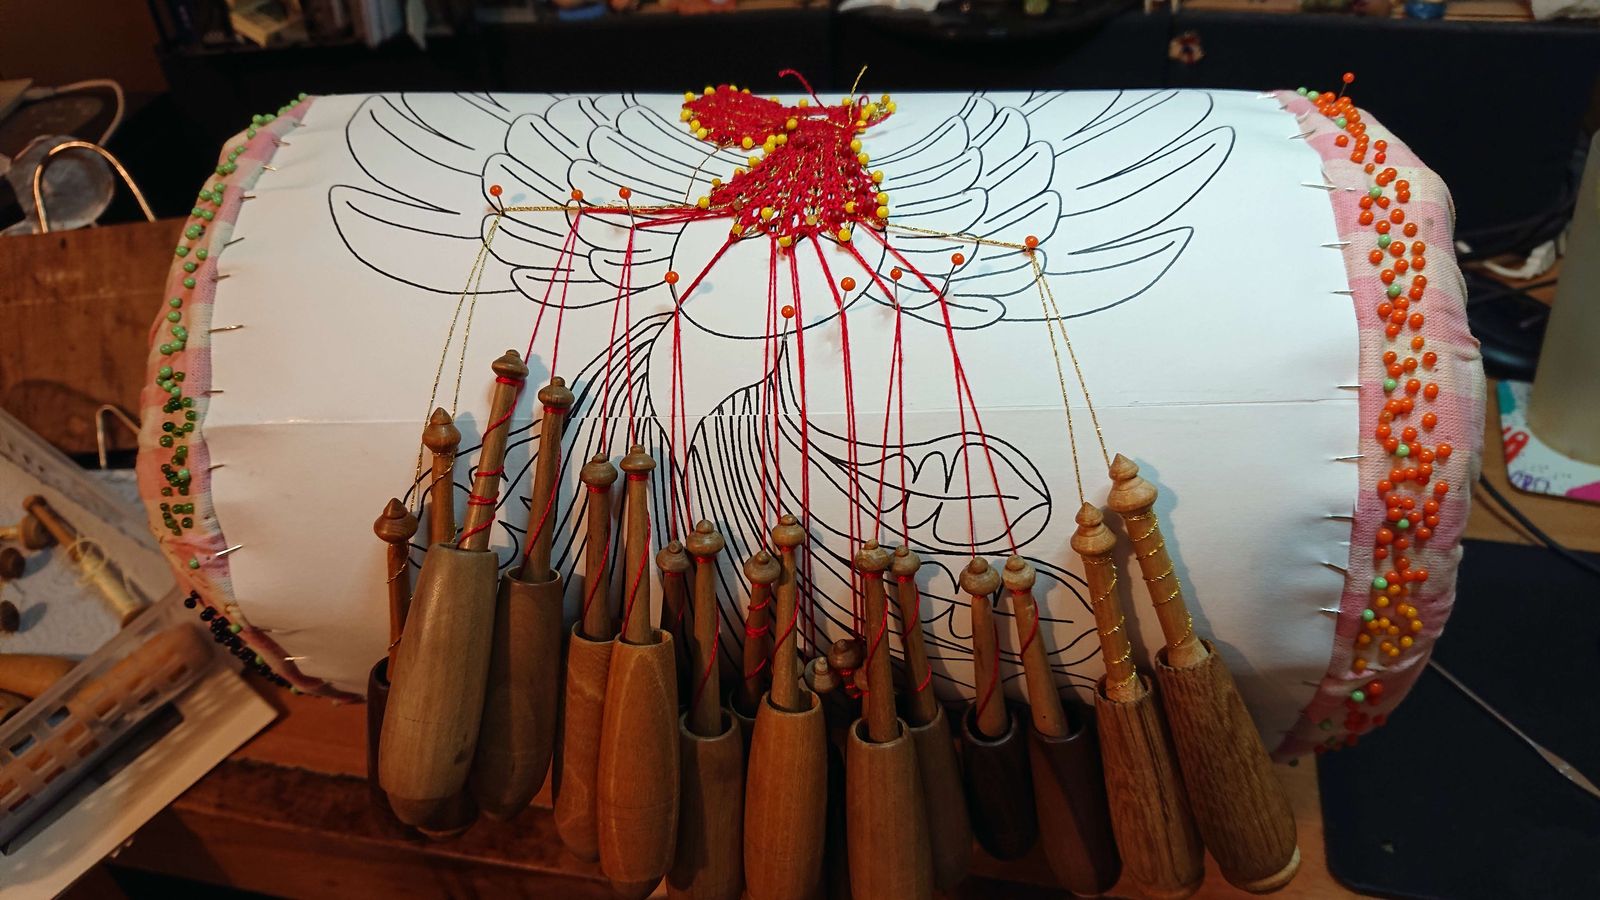
The body was fairly difficult to make. This is the first time that I have incorporated a golden thread – on the outlines of each segment. I think the golden sparkle should work perfectly with a firebird. However the golden thread is a bit fiddly – it is rougher than normal thread and more brittle, thus it is prone to breaking and difficult to pull through a hole with a crochet hook when attaching new bobbins to existing structures.

© Charly, all rights reserved. Click for full size

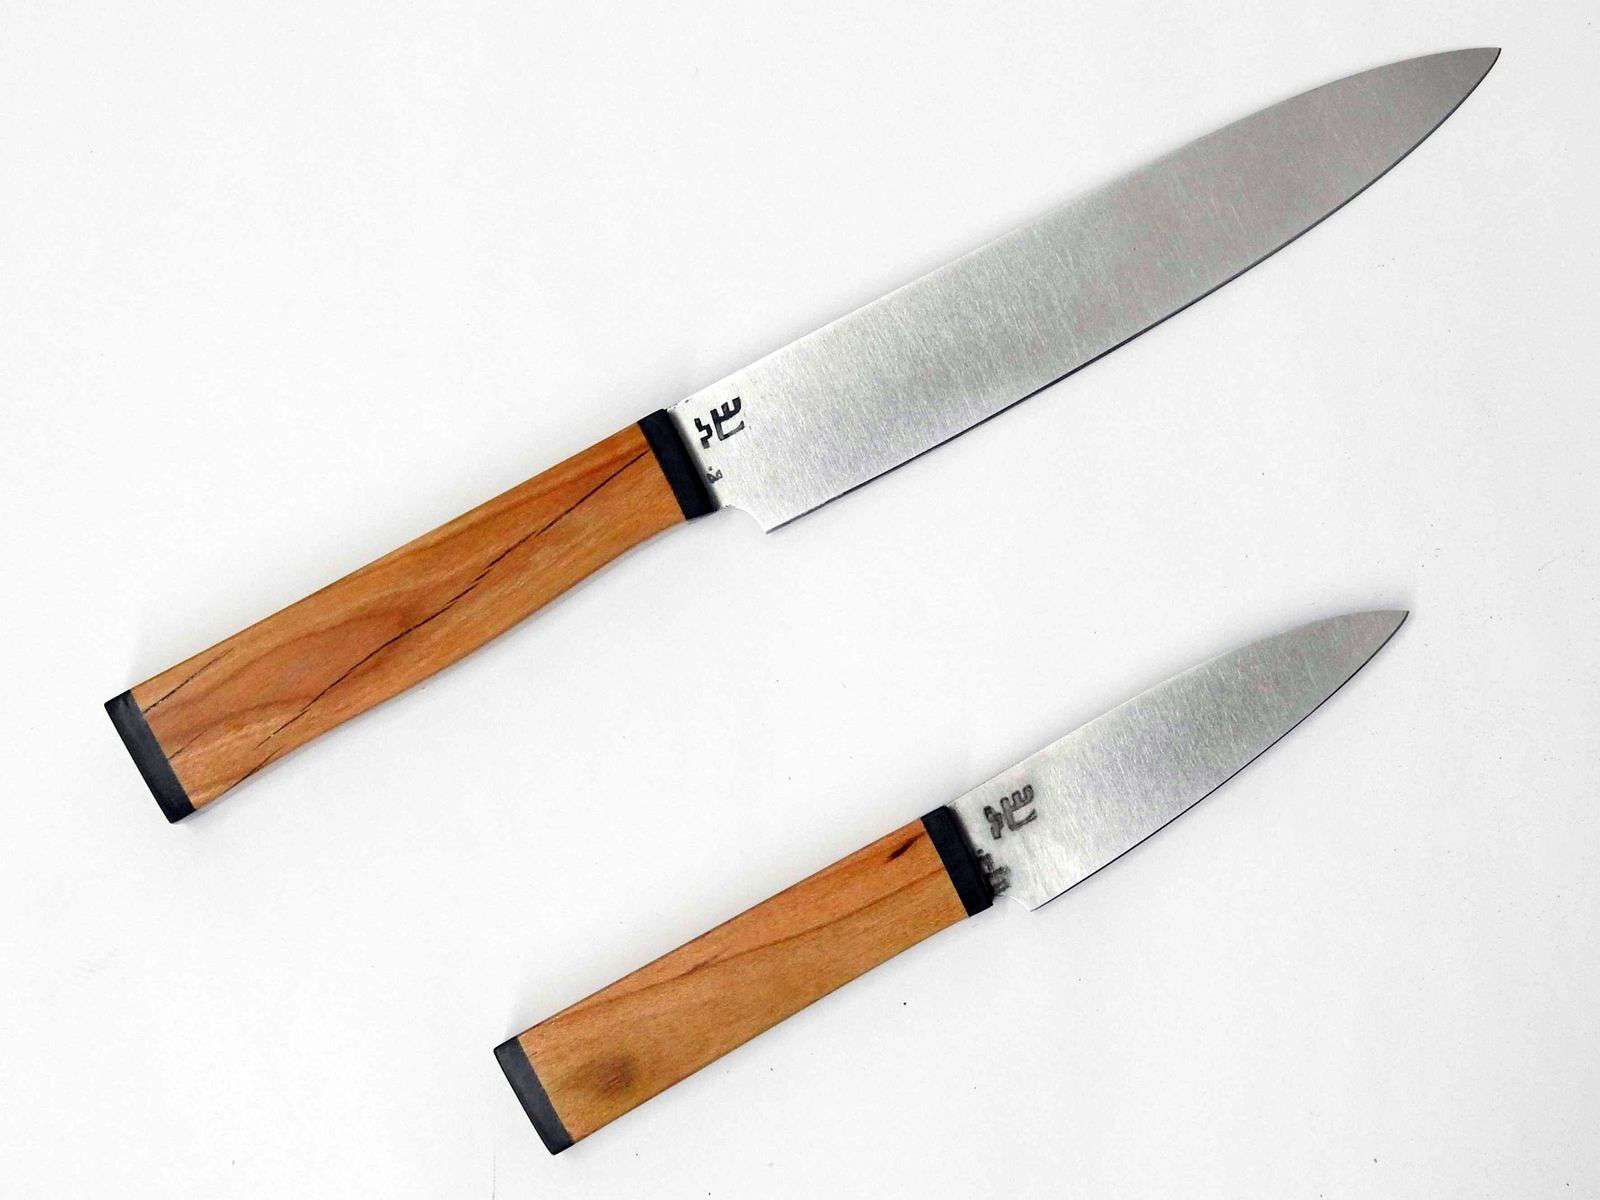
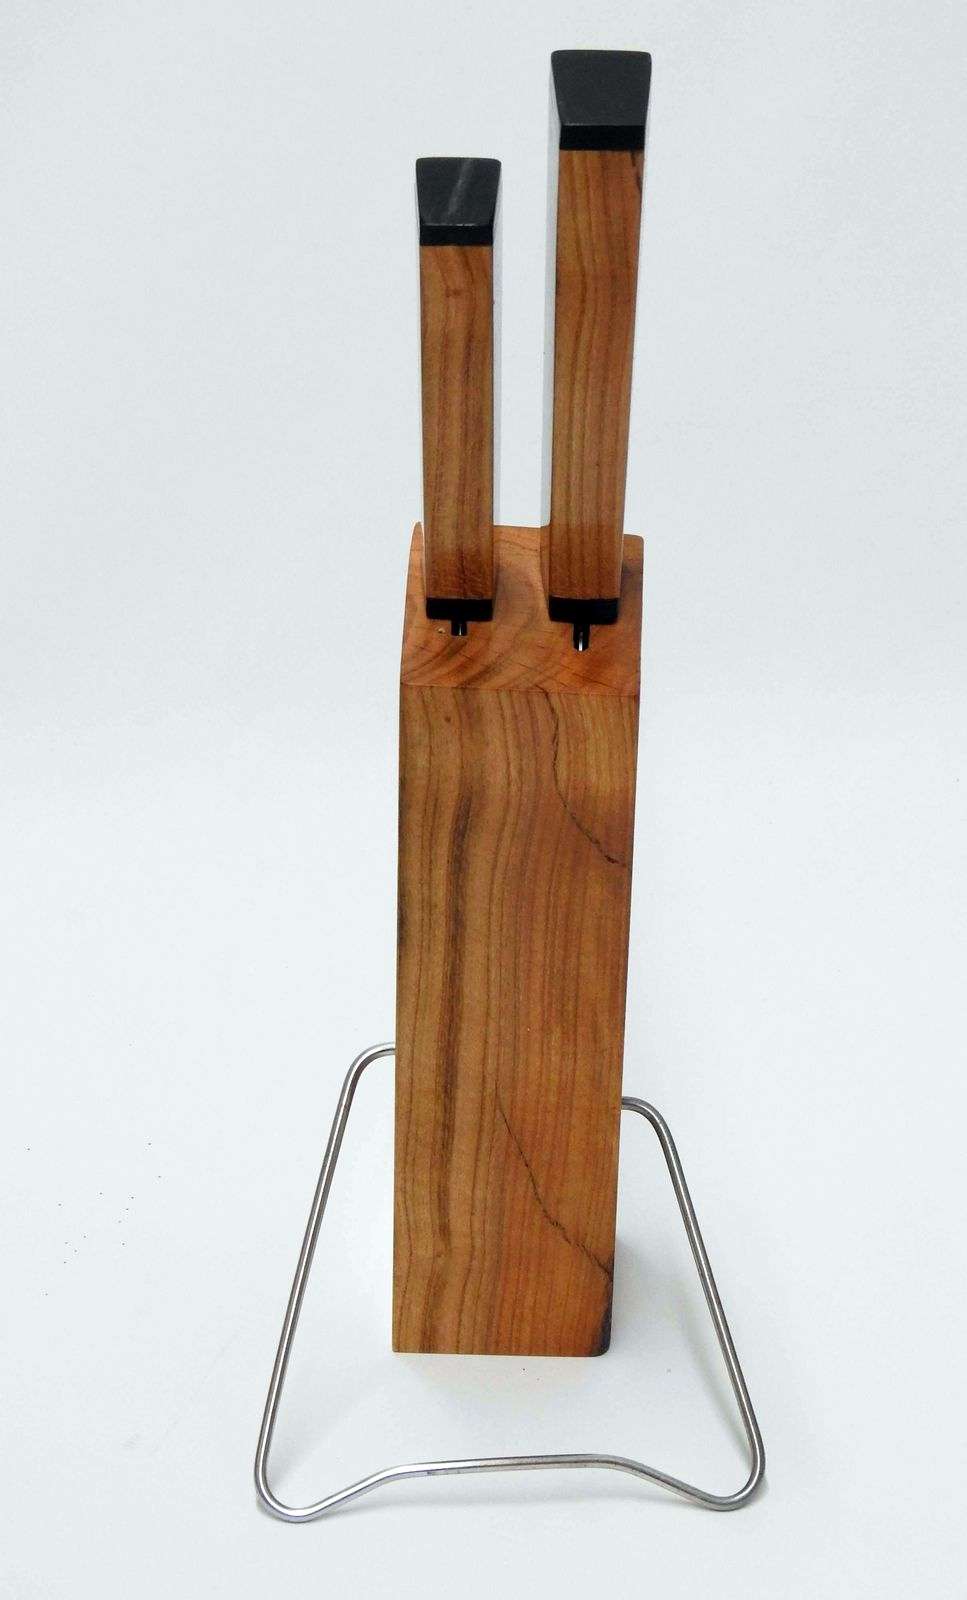
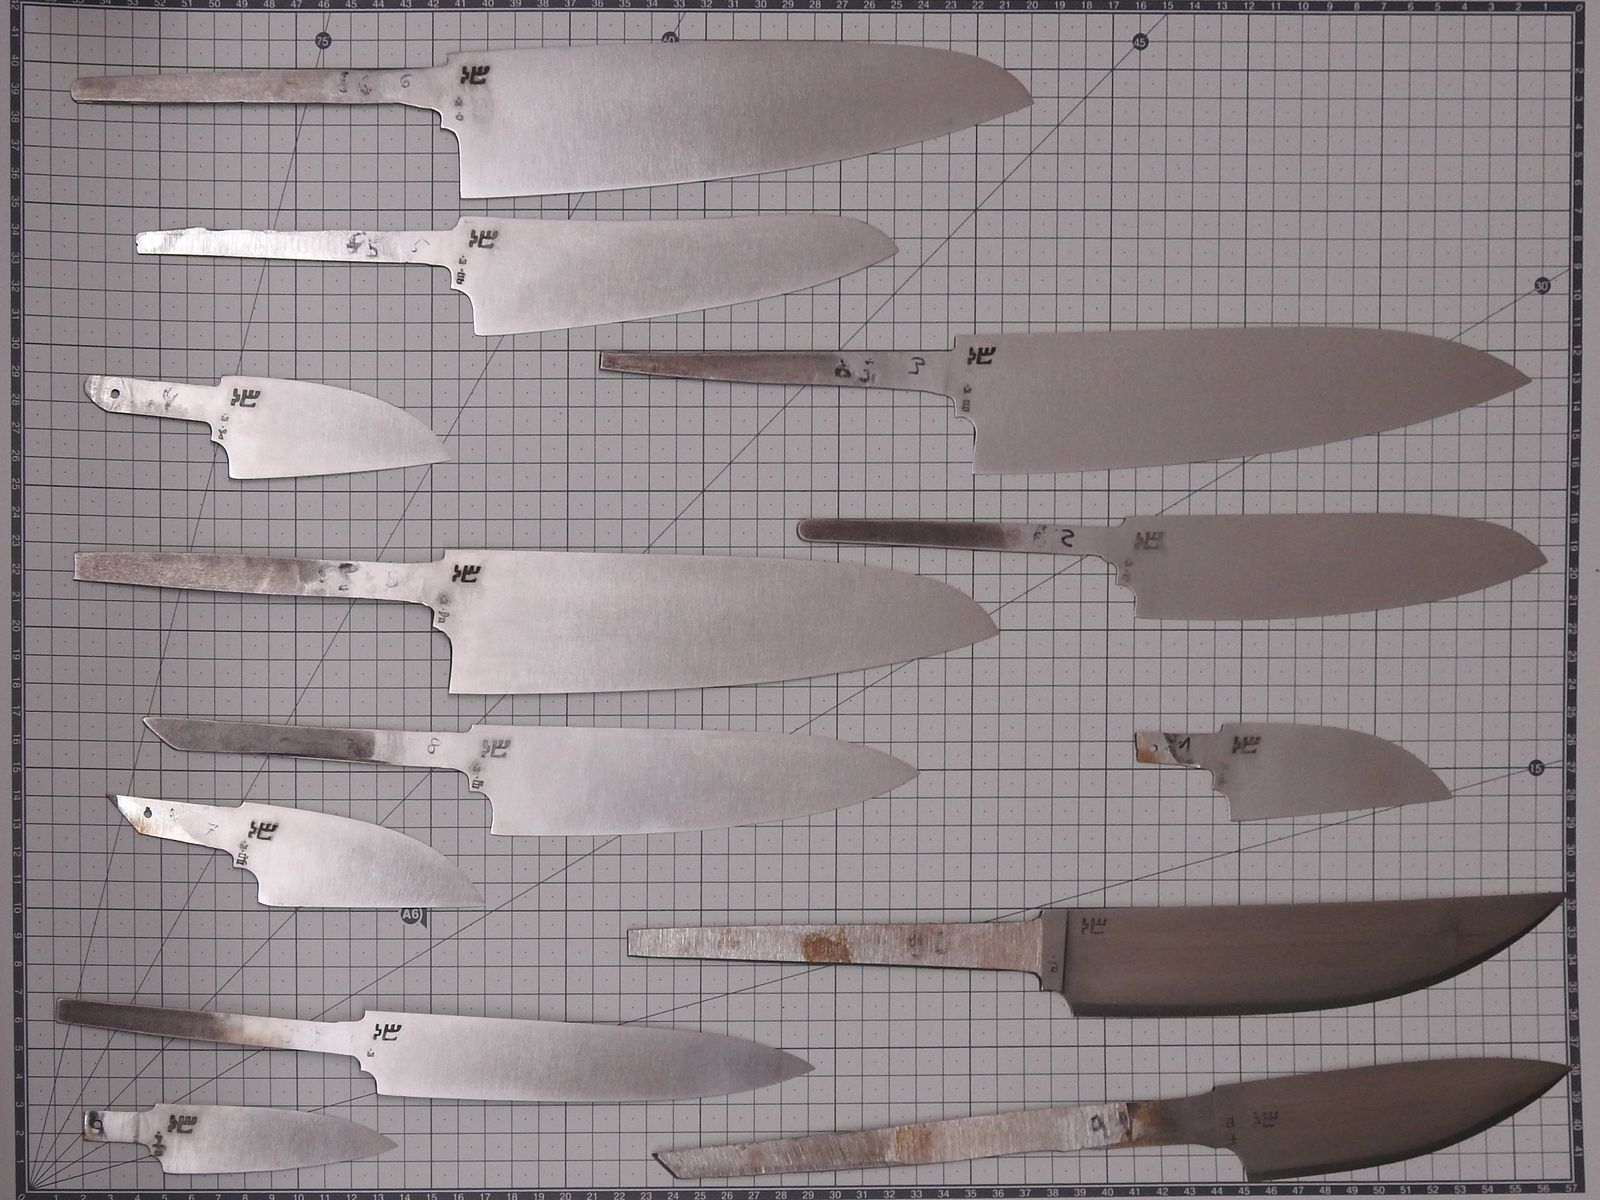
I will show you the progress next time too. I got a small commission to sharpen about twenty knives so I have spent two days in the Worskhop sharpening and today I have been mostly resting and thinking about how to make the tail feathers. I have made the torso with eight pairs of red-thread bobbins. That way when I transitioned over to the triangular-ish tail segment, I put aside two bobbins whenever I reached the base of a tail feather and I only added one more red pair at the end (there are 9 tail feathers). I want to make the tail feathers from several colors with red lines running through the center. There are several ways to do this and I am mulling over which one to use.

This Year’s Gingerbreads

I almost forgot to publish my mother’s creations for this Christmas season.

© Charly, all rights reserved. Click for full size

© Charly, all rights reserved. Click for full size

© Charly, all rights reserved. Click for full size

© Charly, all rights reserved. Click for full size

© Charly, all rights reserved. Click for full size

© Charly, all rights reserved. Click for full size

© Charly, all rights reserved. Click for full size

© Charly, all rights reserved. Click for full size

An Experimentental Knife Set

A friend gave me in the spring some cherry wood from a tree that died and dried standing up in their garden. That means the wood has many cracks, some fungus damage, and discolorations. And she asked for a kitchen knife for herself as her primary cooking knife. The type of blade that she requested would be more of a fish-gutting knife for me, but she has her own cutting style and I am not a knife snob to sneer at someone’s cutting technique. If one is not cutting their fingers off, the main thing is that they get the ingredients down to size and to each their own I say.

I got to work but I got distracted several times. Firstly, when I was cutting the steel, I got a small offcut that just lent itself to be made into a small peeling knife matching the one ordered. Secondly, when I was selecting the wood for the handles, I found one piece that was big enough for both handles and a bloc. And thirdly, when I was pondering making legs for the bloc I got an idea to try to make a foldable leg, so I tested it. Having a lot of problems to deal with makes me extremely prone to such distractions. It is a bad habit.

© Charly, all rights reserved. Click for full size

© Charly, all rights reserved. Click for full size

The knives have very simple rectangular handles that are nevertheless comfortable to hold. The blades are N690 steel,  without ricasso, tumbled. The numbering on the smaller knife is a bit unreadable, but such is life. Bolsters and end caps are from buffalo horn. I made them thin because she expressed a wish for the wood to be the dominant design feature.

© Charly, all rights reserved. Click for full size

© Charly, all rights reserved. Click for full size

© Charly, all rights reserved. Click for full size

© Charly, all rights reserved. Click for full size

The wood grain and cracks in the handles match that in the bloc. This is exactly why I have used this particular piece of wood, it had just the right size for this. The wood has fairly small pores and is not overly decomposed so trying to infuse it with resin would be an exercise in futility, thus I only coated it with three layers of resin, sanded it with 800 grit, and then I buffed it with home-made silica-based buffing compound.

© Charly, all rights reserved. Click for full size

© Charly, all rights reserved. Click for full size

The foldable leg is bent from an old knitting needle. The holes in the sides of the bloc are offset so the leg has two stable-ish positions. It is just a gimmick that won’t probably see much use but it would make packing the knives for travel easier if one were inclined or in need of to take their cooking knives with them on travels. But mainly I wanted to try to make it.

If she accepts these, I will actually only charge for the bigger knife since that is all that was agreed upon. The small knife and the bloc she will get together with her husband as a belated wedding gift.

Another Overabladeance

I was spending way too little time actually making knives this year since I spend two-three days a week carting my parents to and from various doctor appointments. And when finishing this batch, my new tumbling receptacles did not work with this particular type of blades and I had to modify them significantly. However, I do have now thirteen finished blades, eleven tumbled from N690, and two from spring steel, mirror-polished with hamon.

© Charly, all rights reserved. Click for full size

Four kitchen knife sets three three-piece and one two-piece. You might notice that this time I went for blades without ricasso. The reasons are several but the main one is that such blades are significantly easier to make. Really significantly easier. They turned out well and I must say there is something satisfying about getting two chef-knife blades so flat that they stick together when wet. They are probably flat to within a few hundredths of a mm.

The two-piece set in the lower left corner is actually a half-commission. A friend of mine has ordered the bigger blade and I have decided to make the smaller one from an offcut to accompany it. I will also make a bloc as a belated wedding gift. To be fair, I could not give them a proper wedding gift on time since they kept the wedding secret, so it is not that I was inconsiderate, just ignorant.

From now on, I will for several months only dress blades. I still did not finish all of last year’s Overabladeance. The two Puuko I made still have no sheaths. I only started to make these blades because of the commissioned machete in the summer and the commissioned kitchen knife from my friend – I needed a sufficient amount of blades to fill the tumbler and not waste the forge heat. For both things, ten blades is a minimum. So actually I might make some blades again – if I get a commission.

New Tool In Da Shoppe

Last year at around this time my circular saw gave up the ghost and I had to buy a replacement despite not exactly swimming in money. I have put the tool through its paces this summer and it stood up well to all the tasks that I could throw at it, although some objections to the design remain, and some other flaws were made obvious in that time. Nevertheless, the tool appears to be durable and sturdy enough.

This year the demons haunting my shoppe struck again.

I have complained several times about my craparooni bandsaw. I went through the bands rather quickly. The last time I mentioned this, it was suggested that I might not be tensioning the bands enough. So after it snapped another band, I tried to increase the tension a bit. It resulted in the saw band stripping the rubber band covering the driving wheel. That was it, the last drop at which my patience with this cheapo piece of crap has reached its limit. I have moved it to the attic where it will await whether I think of some use for it. In the meantime, I have bought a new band saw from the same manufacturer as my table saw. I am not happy about the expenditure, but I need it and I cannot spend half my time repairing.

© Charly, all rights reserved. Click for full size

I really hope the band won’t snap after just a few cuts. It is bigger and stronger than the previous one, so it cuts faster and there is a lesser risk of the band getting caught and stopped because the wood deforms during the cut a tiny bit.

© Charly, all rights reserved. Click for full size

My shop vacuum did not fit into the dust collector exhaust but the problem was easily resolved with various pieces left over from previous vacuums etc. – I fixed a fitting tube directly to the exhaust and in the other end I glued in a reduction for my shop vacuum.

© Charly, all rights reserved. Click for full size

Despite being bigger, its cut width is not bigger than on the previous one and I could make 2 mm veneers easily. Excellent.

There was, however, one big no-no with this delivery. There was a loose screw and a nut in the package and I was wondering what they are doing there since they were not on the schematics and list of parts. After some searching around I found that they are missing from the band tensioning mechanism and that the other screw in the pair is also loose and on the verge of falling out. That is not something that should happen, ever. Other than that, I have no big objections so far although I only tested it for about half an hour.

A Commision With a Point

I hope the customer will accept this, I am not completely happy with the result. An acquaintance of mine has given me some deer antlers for crafting and she also commissioned a knife made out of one of them. The antlers are from her father, who is a gamekeeper and she wants to have something to remember him by. She requested a small letter opener with a stand that can also work as a paperweight. Lenticular grind and not fully sharpened edges. Oak wood for the stand because her office has oaken furniture.

From the manufacturing point of view, there were not very many interesting things – I ground and polished the blade and blackened it with oak bark, then I fixed it to half of the antler with the burr at the pommel end. Because the antler is old, scratched, and irregular – as antlers are – I have hammered the pakfong pommel into an irregular shape. I also hammered the bolster and I only wire-brushed and polished them over the hammer marks. A bit interesting was the making of the stand.

To weigh it down, I chiseled holes in the bigger piece of wood before gluing it together and I poured molten solder into it.

© Charly, all rights reserved. Click for full size

I learned this technique from my maternal grandfather. I have never met him – he died long before my parents even met – but he made for my grandmother a top for winding the thread on bobbins and the top has been weighed this way on its circumference. Molten solder cools in wood quite quickly and it does not char the wood on the edges all that much, especially if it is hard and dense wood. I was itching to try this out for years.

The pakfong throat on the stand for the blade was a bit difficult to make and there I had to use a creative solution to make it hopefully solid enough so it does not become undone in a breeze. I did not want to rely only on epoxy, so I soldered two pieces of copper wire onto the pakfong piece, and I glued those into tight-fitting holes. This way it should hopefully withstand even some mild abuse like falling on the ground.

© Charly, all rights reserved. Click for full size

© Charly, all rights reserved. Click for full size

The full finished set weighs about 860 g, I have possibly overdone the weighing a bit. The stand is slightly decorated with pokerwork and the underside is covered with brown natural felt so it does not click when put on a table. The finish is tung oil and beeswax, which are more pleasant to the touch than lacquer or epoxy.

© Charly, all rights reserved. Click for full size

© Charly, all rights reserved. Click for full size

© Charly, all rights reserved. Click for full size

© Charly, all rights reserved. Click for full size

© Charly, all rights reserved. Click for full size

© Charly, all rights reserved. Click for full size

Crafting Perk Unlocked – Hamon

When making the commissioned machete in the summer, I had enuff steel left for one additional blade and two more blanks lying around made from the same steel, thus I decided to try my hand at making a blade with hamon again. So far, I have succeeded only once, with a “mystery” stainless steel, and I had to cheat by carbonitriding it for several hours at ca 500°C. The 54SiCr6 is 0,5% carbon steel, which is not ideal for hamon. 1-1,5% carbon would be better. But I decided to try it nevertheless because if I fail, I can (usually) always harden the whole thing.

Well, I did fail in multiple ways – from three quenched blades, one had to be tossed completely, one I damaged because of unforeseen circumstances, and one turned out OK. This is better than my previous attempts and I think I have a working process now for making blades with hamon. Here is how I did it.

© Charly, all rights reserved. Click for full size

First the used materials – three blade blanks ground with 40 grit. I went for three different geometries to see what happens. A sample size of 1 per geometry is of course not very indicative of anything, but it is better than nothing. On the left is a bottle of liquid glass, a water solution of sodium silicate, a chemical that is sold cheaply in CZ and is used to waterproof cement, make cement go harden faster, and as a binder for heat-resistant cement. Then there is a receptacle with perlite, which I have bought in huge amounts for use both in my gardening and knife-making endeavors. And the last ingredient is fine-sieved dirt from my garden taken from deep below the topsoil – I have a heap of this too from the building of my sewage cleaning facility.

© Charly, all rights reserved. Click for full size

The first step was to cover the blades with a thin layer of just the liquid glass mixed with some clay and sprinkle some more clay on top of that to soak up excess liquid glass and prevent cracking of the layer when drying it with a heat gun (a torch and charcoal fire work both too as I found out later).

© Charly, all rights reserved. Click for full size

Here you see the various phases of the second step, which consisted of adding several layers of perlite. For this, I have used the mixture of liquid glass and dirt again, but I have sprinkled it with perlite. The liquid glass serves as a binder, the clay as a filler to prevent cracking, and the perlite as an insulator. I dried the added layer with a heat gun again and I continued to add these layers until I had about 1 cm thick insulating layer on each blade. To finish it off I have added one more layer of liquid glass and dirt only to make a hard shell that holds it all together.

© Charly, all rights reserved. Click for full size

Initially, I went for three different hamon lines, but unfortunately, this did not work out. After I quenched the machete and one of these blades (I forgot which one) without problems, I had trouble reaching the required temperature again because the coals got smaller and the blown air did not reach under the uppermost layer anymore. So first quench was unsuccessful on two blades, I had to cover them again and try to quench them again. This time I was using the charcoal fire to quickly dry the successive layers and it worked well. Next time I am preparing blades for hardening this way, I will probably combine it with BBQ dinner, combining pleasant and useful.

As I already mentioned, two of these unfortunately failed.

The first fail was the blade with a fuller – it cracked near the ricasso. That is always a risk with hardening steel and it is higher with this method it happens even to masters of this craft because the blades must be quenched in water which is more stressful than oil. So while I am not happy about having to toss the blade, I do not beat myself over the head over it either.

The second fail is the drop-point blade. And I am beating myself over the head about it because this is completely my screw-up. I have read books, internet articles and watched videos about how blades with hamon are made, but I do not remember anyone ever mentioning that a peculiar thing can happen when the hamon line is parallel with the edge – the steel has developed lengthwise stripes that when polished, look under certain light conditions and from certain angles like lengthwise scratches made with low-grit sandpaper. I have ground the blade very thin trying to grind these phantom scratches out, I messed up the grind completely at the end near the ricasso and I had to remove the ricasso and shorten the blade to “save it”.

© Charly, all rights reserved. Click for full size

Here you can see it finished. It is still a blade suitable for small outdoor/hunting skinner knife. Maybe. I will think about it and maybe try to make a suitable handle for it. But I do not like blades without ricasso, not only for aesthetic reasons but also because that way the tang actually really is way too thin for comfort near the handle. But I have finished polishing it because I needed to find out the best finishing method on it before finishing the only successful blade. Btw. it still has those phantom scratches near the tang where the hamon is close to the cutting edge. They drive me crazy.

© Charly, all rights reserved. Click for full size

The best polishing process was pretty standard although very laborious. From 320 grit up I have inserted hand-polishing after each belt-grinder step, removing the angled belt-grinder scratches with lengthwise ones. This leads to very smooth and very flat surfaces and crisp lines and ridges. From 2500 grit upwards it was only hand polishing and only lengthwise. Here you can see the result at 5000 grit, which is the phase at which I left the workshop and went indoors. I have tried buffing the failed blade with buffing wheels and commercial buffing compound but this has led to an interesting effect – the hamon went completely invisible although it could be brought out by etching with oak bark for an hour or two. So for this blade, I have forgone the buffing altogether and went to 7000 grit sandpaper with walnut oil (it is runnier than other edible oils, and does not stink like WD40). 7000 grit is the finest abrasive paper that I can easily buy but it still did not bring out the hamon very well. I could just about see it but it was still nearly impossible to make a photograph of. I etched it with oak bark, but I did not like how it looks so I removed the oak patina again with 7000 grit and I tried another buffing method, one that I have used in my rondel dagger project – very fine hematite.

I put some paper towel cuts in a receptacle with finely ground and sieved hematite dust and shook it a bit so some dust gets caught in the paper towels. Then I dusted the paper towels off to remove the coarser particles that still might be there. I smeared some dubbin on the blades and I tried buffing them manually with these hematite-primed paper towels with lengthwise strokes, using the spine of the blade as a guide. And that has resulted in a nice mirror-polished hardened edge and slightly foggy yet still mirror-polished soft spine, making the hamon really pop out. That way it was not only easily visible but I was also finally able to make a picture.

© Charly, all rights reserved. Click for full size

Hamon is the white line between the darker hardened edge and the lighter soft back.

I am not planning on making very many of these but it is nice to have the knowledge and skill how to do it. I think this blade is deserving of nice fittings so after I etch the logo and serial number, I will start seriously thinking about what kind of handle and sheath to make for it. I am done making blades for a few months however, I still did not dress all of those from last year’s overabladeance and I have eleven kitchen-knife blades in the tumbler now. Unfortunately, I have longer pauses between knife-making days than I like.

Sciencey Thoats About Tangs

Teh almighty YuTub algorithm has recommended this video to me:

Why military gear isn’t always a good idea…

And whilst I do agree with the title and the overall message of the video, I do have some objections to it. It is not an issue that can be distilled down to a universally true video quip.

First the agreements:

Military gear that is issued to grunts en masse needs to be essentially consumable. The grunts will lose it, steal it and/or destroy it with gross abuse and negligence on a regular basis. I read about conscripts in the Austrian army in WWI breaking their bayonets by opening cans. Stealing was a problem even in former Czechoslovakia, with the UTON  even though that was not issued to every grunt but mainly to paratroopers. The knives disappeared regularly as the soldiers reported them “lost during exercise” even though they had to subsequently pay for them and everyone knew they took them home. Those knives are good, but they are not as excellent as some people think they are “military grade” is definitively not always a synonym for “high quality”.

Now the disagreements:

A good bushcraft knife needs not to have a full tang to be reliable. It is more complicated than that – rattail tangs were and are used in even swords and machetes to this very day and they are not useless. Puuko is a survival knife with hundreds of years long tradition for example. The above-mentioned UTON also has rattail tang, and one that does not go all the way through the handle at that, and still it is a knife that can withstand serious abuse. I have put some of my knives with similarly thin tangs through their paces, both full-length and half-length hidden tang and they withstood serious abuse just OK (although I was only using them as knives, see further). Hidden tang alone is not an issue, the overall construction and heat treatment are.

My biggest beef is with the presented “knife gets stuck and you try to wiggle it out”. Sorry, but if your knife gets stuck in something hard right up to the hilt, then you are probably an idiot for using the knife wrong. A knife is not, and should not be used as a pry bar. But let us say one were to use a knife for making firewood splinters from a log by batoning. That is a legitimate use for a bushcraft knife and it can get stuck that way. It happened to me with my working knife and I had to use serious force to get it out. However, if you try to “wiggle it out” by holding it solidly against the ground and pushing at the handle sideways, you are definitively an idiot for trying to remove it in the least effective and most dangerous way imaginable. Simply put, abuse like that shown in the video does not represent even remotely reasonable and appropriate use of a knife, not even a bushcraft knife that should be sturdy.

Another thing I would like to address is the handle material. It is shown to be natural leather rings and apparently, not overly compressed and not glued together or hardened. That is a problem because it is a soft material that can easily be compressed and give way for the tang to bend. A wooden handle – like on European medieval swords and daggers – significantly improves the resistance of the tang against bending. If the rings were glued together and hardened by hot wax or boiling or epoxy, it would improve the durability and resistance of the handle significantly too.

The thickness of the tang and the blade at the weakest point plays a far greater role than the width. The force needed to bend/break a flat profile rises linearly with width but exponentially with thickness. If you double the width of the tang, you double the force to bend/break it. But if you double the thickness of the tang, the force needed to bend/break it can rise approx ten times (I do not know exactly how much, the calculations are complicated and I cannot pretend to understand them). So a knife with a thickness of 3 mm and full width (~15 mm) tang will be about as strong as a knife with a thickness of 4 mm and 6 mm wide hidden tang.

A role also plays the heat treatment of the tang. A fully hardened tang will be stronger and more resistant to bending and will spring back when bent. But when bent beyond the plastic deformation, it will be more prone to permanent damage and/or catastrophic failure when straightened again as shown in the video. Unhardened tang – that is used throughout history for swords from Europe across Asia all the way to Japan I might add – is easier to bend but can subsequently be straightened again.

And lastly – anything will break if used wrongly or excessively abused. A knife is not bad because it cannot be used as a pry bar and a pry bar is not bad because you cannot cut cutlets with it. When I made the custom machete, I tested it by hitting a brick with it – but I still advised the customer not to do that.

Showing off My Wood – Part 5

I had a very busy October and only now it seems like I will be able to do some work in my workshoppe again. I was able to do some, but not much. Mostly I was working around the garden, harvesting nuts and fruit etceeraaaa. In the end, there was probably over 50 kg of walnuts and I had to spend a few days working with the nutkraken because my father was tired. Long lever or not, it was just too much.

I put 16 kg of shelled nuts aside for oil making and I will probably need to build a better solution for cracking the buggers in future years. We already have two more walnut trees in the garden, so there will only be more work. Although they are probably still quite a few years from fruiting. One is a seedling, now circa 10 years old, and another is a grafted red walnut, two years old.

Over three weeks I have spent two to three days a week taking my mother to and from rehabilitation. It seems to have been worth it. This Wednesday she was finally able to straighten her right leg at the knee to over 75%, which was a huge step up since it was barely 50% two weeks ago. That was indeed a happy moment.

So let’s take a break now and show you the last of my wood collection.


Sweet and Sour Cherry (Prunus avium & Prunus cerassus)

You may remember how I was forced to fell a huge cherry tree in my garden. That tree has warmed us in the winter for over a month and of course, I have also put a lot of wood aside for crafting. This is just the tip of the iceberg. It is highly improbable that more than 10% of this will ever be made into some kind of product. Maybe if I manage to get together some viable process for making cutting boards. And of course, to sell what I already have made, I am getting a bit cluttered.

© Charly, all rights reserved. Click for full size

Unfortunately, I did not put aside very many long pieces of this wood. There were not many opportunities. But when I was processing all the wood that I have set aside over the years, I have found several long logs of sour cherry and almost miraculously they did not develop very many cracks and neither got they invested with wood borers. So I have also several nice and long-ish prisms of sour cherry wood, two or three bundles like this one. I think those would make very pretty knife blocs and if used as veneer, I could make quite a lot of big ones at that.

© Charly, all rights reserved. Click for full size

And surprisingly, some of the logs shed the bark quite easily and it too was uninfested and undamaged by bugs in many cases. Thus I have put aside the bark too. I could make it into layered handles (I do not know anyone who has done that with cherry bark). If I do not use it in the end, my inheritors can always burn it for heat.

© Charly, all rights reserved. Click for full size


Willow (Salix sp.)

One of the pollarded willows in my garden looked kinda sickly so I have decided to fell it. And because the pollarded head was full of knots and twists, almost like burlwood, I put it aside and cut it into prisms. I have also “obtained” probably a willow rootball from the garden of a nearby abandoned former sanatorium, where several trees were cut/uprooted during conservation works and most of the wood was left there to rot. I hit a stone in the rootball blunting my table saw a bit but the wood is at least pretty. The upper and left wood in the picture is the pollarded willow head, and the lower right wood is from the rootball.

© Charly, all rights reserved. Click for full size

That is all as far as wood goes. I do have some other crafting materials that are intended for use in knives, I will possibly make posts about those later.

Making Walnut Oil

I spend several hours daily now picking walnuts and laying them out in a designated room to dry. Some days “just” one bucket, other days more. And since we did not eat all walnuts from last year yet, I have been thinking about how to process them in a useful way. And I have decided to try to make walnut oil. I have wasted two kg of low-grade walnuts and one kilo of moderately good ones trying to devise a process that works and I did come up with one in the end.

The first try cost me three hours of work, 700 ml of acetone, and resulted in barely 50 ml of oil from 1 kg of shelled walnuts. Not good.

The second try cost me five hours of work, 1400 ml of acetone, and resulted in roughly 150 ml of oil from 1 kg of shelled walnuts. Better, but still not good at all. This second try also resulted in me having a still now. I might make separate posts about that after I test its newest iteration – the first iteration was not very good at recovering the acetone from the solution (acetone is just too volatile) and after I modified it, I found out I don’t necessarily need it anymore.

Because the third try resulted in roughly 500 ml of oil from 1300 g of shelled walnuts after three hours of work and without the use of any chemicals and with minimum use of elektrimcity. And with walnut oil costing around 40€ per liter, that is financially viable since the next batch should be finished faster – I have a functioning process now and there won’t be any fumbling next time.

So, here goes the process:

  1. Drying the shelled walnuts at 45 °C in a fruit dehumidifier for 12 hours. This step is necessary now because the walnuts are freshly collected from the garden and when ground, they do not release oil but make a paste from which the oil is very difficult to extract. My first attempts at drying the nuts for a shorter time (2 h at 80°C or roasting 5 min at 190°C) did not work, thus me trying to extract the oil with acetone. I learned that the important thing is to get the walnuts completely dry, the shelled kernels should rustle when agitated.
  2. Running the dried walnuts through a meat grinder. This picture is from my first attempt but it is representative of how the shredded nuts looked after first grinding in my final attempt too. I am using an old hand-cranked meat grinder because I did not want to use my mom’s kitchen robot for experimentation. I probably won’t use it for this anyway, grinding the nuts is a bit harder than grinding meat and I fear the robot could get damaged. This old thing was made in times when tools were made to last and not break a month after the warranty expires.

    © Charly, all rights reserved. Click for full size.

  3. Running the dried walnuts through the meat grinder again. This time they started to expel some oil already.

    © Charly, all rights reserved. Click for full size.

  4. And finally, I run the thoroughly shredded kernels through another nearly antique kitchen appliance – a hand-cranked juicer. This resulted in 550 g of highly compressed dry matter with some oil residue, and the rest was oil mixed with some fine particles.

    © Charly, all rights reserved. Click for full size.

  5.  Leaving the oil to settle out the particles. It will probably take a few days. I will skim the oil from the top in the meantime and add water for the particulate matter to drop into. I may use the still again to refine the oil further, using some chemicals again, but it can wait for later. For now, I just wait for it to settle. Here you can see how it settled after 24 hours.

    © Charly, all rights reserved. Click for full size

I was not particularly careful about Hi Jean this time. The first 1000 ml of walnut oil (including oil from the first three experimental runs) will be refined and boiled for use as a food-safe wood finish and not for direct consumption. I do not have personal experience with walnut oil yet but allegedly it has advantages over linseed oil. It has a lower viscosity and thus seeps easier into the wood. It dries quicker. And it does not yellow with age as much as linseed oil does so it should not discolor the wood as much as linseed oil does, making it useful for lighter woods as well as dark ones. I intend to make several end-grain cutting boards at some point in the future.

However, I have cleaned all the appliances thoroughly now and next time I am making the oil, I will also make 1 l of cold-pressed oil – or maybe even more – for consumption. Walnut oil is a bit of a luxury foodstuff so we have no experience with its culinary use either but I am sure we will find some use for it in our kitchen should we have it. And an advantage of 1 l of oil is that it takes a lot less storage space than 5 kg of unshelled walnuts or 3 kg of shelled ones. Making it does not cost nearly as much as even cheap cooking oils do in financial terms, picking and drying the walnuts has to be done anyway, so there is only some work on top of that. And whilst it is not easy or quick work, I do have more time than money and I need the exercise anyway.


Improvipairing mah Belt Grinder

Three weeks ago one of the idler wheels on my belt grinder gave up the ghost with a screech and a puff of smoke. I was wondering why everything was overheating lately – the belts, the platens, the hweels, teh hwole heveryting. As it turns out, one of the ball bearings on one of the idler wheels was probably a bit off and when a ball bearing starts to go bad, it gets only worse from there. I have impromptu repaired the wheel but I have decided to take this opportunity to rebuild and improve my belt grinder.

The first step on that path was buying a bunch of precision-cut aluminum tubing.

© Charly, all rights reserved. Click for full size

The only downside was that the ball bearings fit too well into these tubes, they could be inserted without any effort whatsoever. And I do not have a lathe to cut grooves for internal snap rings. So I have used stainless steel foil strips as shims for one ball bearing to press it firmly into the tubing with the other ball bearing only inserted and held in place with the nut in the assembly.

© Charly, all rights reserved. Click for full size

Here you see one of the new wheels before it was assembled on the belt grinder. Aluminum tube with one firmly pressed in ball bearing, steel spacer with a piece of cork to hold it somewhat centered (I have drilled the center of the cork a lot more later on so that the spacer is really loose. The cork is there only so the spacer does not wander too far off center when assembling/disassembling), and the second ball bearing.

I have made three such wheels, and over one I have pressed another aluminum tube to increase its diameter. That one I later fixed in my drill and with the help of my impromptu repaired belt grinder I gave that wheel a barrel-like profile. Because my old tracking wheel was too getting worn and I decided to completely rebuild the spanning arm.

© Charly, all rights reserved. Click for full size

Here you can see the right side of the spanning arm with the new spaning wheel. I won’t go into technimicical details. Here you have a second picture of the left side, it should be worth a thowsand words.

© Charly, all rights reserved. Click for full size

This is in part made from new materials. The downside of this assembly is that I had to weld a 30 mm M10 nut onto the arm. Which was not easy. To say that I suck at welding would be to grossly and immodestly overstate my abilities. When I die, the average welding ability of humanity will probably go ever so slightly up. But after a few botched attempts, I have managed to make welds that at least hold in place, even when they look completely craparooni.

The tracking wheel is on an M10 thread rod and thus can be moved left-right with the help of the upper handle. That is necessary to at least somewhat center the belt on the tracking wheel to avoid asymmetric wear of its surface, My previous assembly did not allow for this and as a result, the wheel got really worn on the left side only.

The second screw under that allows for slightly tilting the spanning arm left-right. That moves the belt slightly from left to right, allowing it to center on the platen. This was starting to be difficult with my previous arm, in part because the assembly was a bit too sensitive (short pivot point) and in part due to the asymmetrical wear on the tracking wheel.

I have used the improved belt grinder for a few hours and it seems to work well. When the current batch of knives is in the tumbler, I will coat the wheels with PVC plastic and perhaps start making some other attachments for the belt grinder.


Showing off My Wood – Part 4

My mother continues to get better. I have harvested over 50 kg of plums and about 10 kg of apples this year and she has been removing the pits and making marmalade, compotes, and prunes for over a week. The freezer is full of de-pitted and halved plums, we have 2 kg of prunes in the cellar and a huge amount of canned fruit product, thus we are set up for years. This is good because a harvest like this is exceptional.

My father seems to be well after the reduction of antipsychotics. He is able to move and do something again whilst not getting any psychotic fits for a few weeks by now. Today we were at the psychiatrist for a check-up and his long-term memory is apparently in good shape for his age, but he has a short-term memory problem for which he was recommended to exercise a bit with games and puzzles. Alzheimer’s or any other type of severe dementia is, for now, not an issue. If he continues to do well, the antipsychotics may be reduced again at the next check-up at the beginning of next year. At least he genuinely enjoys cracking nuts with the Nutkraken and is positively eager to do it.

I have so much work in the garden and around the house right now that I have barely time for anything else. However I still have some pretty woods to write about, so lets go to it.


Tamarisk (Tamarix)

© Charly, all rights reserved. Click for full size

My favorite aunt used to have a big tamarisk tree in her garden but they felled it a few years ago. When I was visiting, she gave me some of the bigger pieces in case I can make something pretty out of them.

The wood has developed a lot of cracks during the drying, it will need a lot of filling with epoxy. But it has interesting color and texture – the sapwood is bright yellow and the heartwood is reddish-pink with orange-yellow streaks like flames. I think that if I will the cracks with red or orange resin, maybe with glitter, I could get genuinely interesting-looking pieces out of it.

It is one of the few kinds of wood that I can smell when I work it and it is not pleasant. It stinks to the high heavens, to be frank.


Thuja (Thuja sp.)

© Charly, all rights reserved. Click for full size

I only got two pieces of Thuja put aside. I could put aside more from a tree that was uprooted this spring in my neighbor’s garden, but I do not think I will. It is a plain-looking softwood. I will possibly use it for contrast pieces and spacers for darker woods of similar hardness if I ever work with one but I do not think it is worth using on its own.


Yew (Taxus baccata)

© Charly, all rights reserved. Click for full size

© Charly, all rights reserved. Click for full size

Interesting-looking and reasonably hard softwood. Heartwood is reddish-brown, and Sapwood is creamy-white. It is similar to juniper wood that I have shown you previously. I think it might be interesting for both kitchen and bushcraft knives, but since it is poisonous, I will have to be very careful whenever working with it, especially when sanding or filing it. A respirator is a must, people can get – and did get – poisoned from inhaling its sawdust. I have several pieces big enough to make knife bloc, especially if I economize them and use them as veneers. I did not have a piece big enough to make a longbow. Pity.

That’s it for now, but I still have some nice woods to brag about, so stay tuned.

The Nutkraken

It is the season when the walnut tree is shedding its bounty. We still haven’t eatet yet all the nuts from last year and it will probably take some time to eat them, possibly a whole another year. And this year’s harvest promises to be even bigger than last year’s. Thus I have some nefarious plans with the nuts this year.

Howevah, all plans include cracking the nuts first. We do have a small hand-held nutcracker, but that is good only if you want to crack a few nuts for a snack, not when you need to go through a bucketful every day. I have tried to make a small lever nutcracker from an old drill press. It worked, but not great. So this year we brainstormed some ideas with my father about how to proceed and this is what I came up with later in the workshope when looking for suitable materials to materialize our idea – behold the mighty Nutkraken:

© Charly, all rights reserved. Click for full size

I made it in about 5 minutes from a piece of board, two armrests salvaged from my father’s old armchair, a 10 cm piece of 4 mm fencing wire, and a bottle cork.

The armrests are connected on one end with the fencing wire. That end not only had pre-drilled holes. The armrests have an S – curve that has a nice short curve on the connected end and a long one on the other, making a nice indentation for the walnut and more than enough space for fingers. The lower arm has attached a perpendicular piece of board to it to stabilize it and to allow for it to be fixed to the table via clamps. After some testing I have added the bottle cork so the nuts do not get totally obliterated, making it easier to separate the shells from the meal. With a bit of additional work it could even be made to look pretty, but I probably won’t bother with that. I usually don’t with tools.

My father enjoys his new toy greatly and he cracked and shelled a bucket of nuts yesterday in no time. Those were low-quality nuts, and I intend to test some things with them first either today or tomorrow before I proceed to mangle the good-quality nuts that start falling next week. I will let you know the results of my sciency experimoments promptly.

The Nutkraken works magnificently. No sprain on wrists and fingers, no over- or under-crushed nuts, no problems whatsoevah.