Jonathan Pariam. The Prairie Farmer Horse Book. Chicago, Prairie Farmer Publishing Company, 1891.
via: The Internet Archive
Jonathan Pariam. The Prairie Farmer Horse Book. Chicago, Prairie Farmer Publishing Company, 1891.
via: The Internet Archive
The line between artist and artisan can be a bit blurry and some people can actually be both. As it is in my opinion this case – there is a great deal of craft involved, as well as creativity.
I must confess though, I find the art and the process a bit creepy. A lot creepy. Despite the fact that my own creative process when I was painting was in some aspects similar – first a sketch of a skeleton, then add muscles, then skin, then clothes.

John Muir. Steep Trails. Boston & New York, Houghton Mifflin Company, 1918.
via: The Internet Archive

Lydia Whitaker. The Prophet of Martinique. New York, J.S. Barcus Company, c1906.
via: The Library of Congress
Well, the title gives away that this article won’t end well. I am glad I did not start to write about this project right from the start as a series, I dislike having expectations build up only to be disappointed so I do not wish to do that to readers. And this is why I was also putting off work on this for so long – it was always a project with the potential of high reward – and high risk of failure.
You may remember that Marcus was so very kind and has sent me some damascus to play with, three pieces to be precise – one san-mai of 1095 and cable and two pieces of just cable.

© Charly, all rights reserved. Click for full size.
Here you can see the san-mai piece on the right already partially cleaned and ground, then in the middle is the smaller piece of cable with the scale cleaned off already with vinegar bath and on the left the big piece of cable damascus as it came. On that one, I had to grind the scale off with an angle grinder and after that, I have ground all the pieces to flat-ish until I could not spot any imperfections on the surface that might signify poor weld. This must be done since each inclusion or poor weld increase the probability of failure. It took me the whole last Friday to do this.

© Charly, all rights reserved. Click for full size.
With all the pieces flat, I could decide what kind of blade I would want to make out of them.
The san-mai damascus had one end of the bar rather ugly and it had an unseemly weld right in the middle, so making it into a long blade with hidden tang was not feasible. So I have decided to make it into a small drop-point boot hunting knife.
The smaller piece of cable damascus would look great as a dagger, but for that, it was too thin, so I have decided to make it into a pairing knife.
The big piece was just about the right size for either a big chef-knife or a chopper. I have decided to go for a chopper.

© Charly, all rights reserved. Click for full size.
I cut the excess with angle-grinder and then ground the outlines and bevels with 40 grit belt (which was a matter of mere minutes with my new magnetic jig, it works really well and I am happy with it). A draw-filing took care of all the perpendicular scratches and flattened the surfaces a bit and my new file-guide has proven itself very useful for making the shoulders flat and straight. It really does speed up the work when you have proper tools at hand. And in case you are wondering why the clothespins – they reduce vibrations and therefore the noise the blade and the tang make when filing the shoulders.
Drilling the holes was a nightmare, I have destroyed three 3 mm drill bits, which is something I did not expect. But I have managed to drill al I need and with this, I was done on Saturday.

© Charly, all rights reserved. Click for full size.
Today I have decided to normalize the steel before quenching, so I have covered all three pieces with a thin layer of clay to protect them from decarburization, I have heated them above austenitic temperature and then put them into a bucket of pearlite to cool off. That is a bit slower than how normalizing is usually done (which is air-cooling for about an hour) but faster than how annealing is done (which is very slow cooling in the furnace for multiple hours). I have done this two times for the cable damascus (with straightening after the first cycle – the pieces warped, showing that it was a good call to normalize them) and after that, I have performed one more air-cooling cycle for the san-mai, because it is much thicker than the other two and has required more straightening.
I wanted to try differential hardening on the cable damascus so I have prepared a mixture of clay, perlite, and a tiny bit of water-glass as a binder and adhesive. I did not want to wait overnight for it to dry, so I have used first a heat gun and then the forge with low-fuel reducing flame to dry it quickly, thus the dark greyish color of the clay. No clay fell off, it did not crack either, so far it seemed all to work well.
Well, quench is when it all went wahoonie-shaped.
First I have quenched the small blade, in water. Unfortunately, it was so small that I have overheated it, and thus instead of the differentially hardened blade, I got a full hardened one. I have decided to not try again and I will finish it as it is, it can still be a good blade, just not with a hamon.
As second went the san-mai. I have quenched that first in sunflower oil, pre-heated to 100 °C, and then in water. It has definitively hardened and it seemed to be OK afterward.
Last I have hardened the big chopper. I have learned my lesson from the small blade so I have paid more attention to color, adjusted the flame, and took care to heat the blade to only just above the austenitic transition on the cutting edge and just below that on the covered spine. Then I plunged it into water, agitated, pulled it out, plunged it in again, and agitated it some more to cool it off below the martensite start temperature quickly enough for it to harden.
And during that second plunge, I heard a quite tell-tale “ping” sound. That was the moment I knew this blade has failed. I have scraped the scale and clay off with an old angle-grinder disk and took it in daylight to search for a crack. And I found it, right in the middle of the blade.

© Charly, all rights reserved. Click for full size.
I will polish the blade a little bit in order to see whether I have succedes at the differential hardening at least (preliminary scratch-test would suggest yes). However the size and position of the crack make it unlikely that the piece will be salvageable for a smaller/thinner blade, it is smack in the middle and it seems to go all the way through the hardened part right up to the soft material on the spine.
Today was not a good day, however from what I have read, this happens even to very experienced smiths. Even so, it sucks. I hope that at least the remaining two blades have no nasty surprises hidden for me.
I will have to buy some high-carbon tool steel to practice differential hardening some more.
This is just to let you know that the little persimmon tree is growing like mad. It is about 30 cm in height now and still growing, it might reach over half a meter before fall. Which would be awesome. The leaves are a bit big, not too big, but definitively on the upper limit of what I find permissible for a bonsai. There are techniques to make the leaves temporarily smaller, but it remains to be seen if persimmon is able to handle them. Preliminarily I would hazard a guess and say yes. Still, a deciduous tree with very big leaves can still make smashing bonsai in winter and early spring and I am excited that this tree is healthy and prospering, unlike many others in last years.

© Charly, all rights reserved. Click for full size.

Andrew Lang. The Orange Fairy Book. Illustrated by H.J. Ford. New York, Longmans, Green, 1906.
This week’s Andrew Lang fairy book comes to us courtesy of the colour orange. As usual, I’ve attached all of the full-page illustrations and they’re a delight. Done by the talented H.J. Ford, each one is filled with wonder and whimsy. Last week I told you that this is the last book of the Andrew Lang coloured series and I was wrong. There’s one final book which I’ll post next Saturday. Until then, Enjoy.
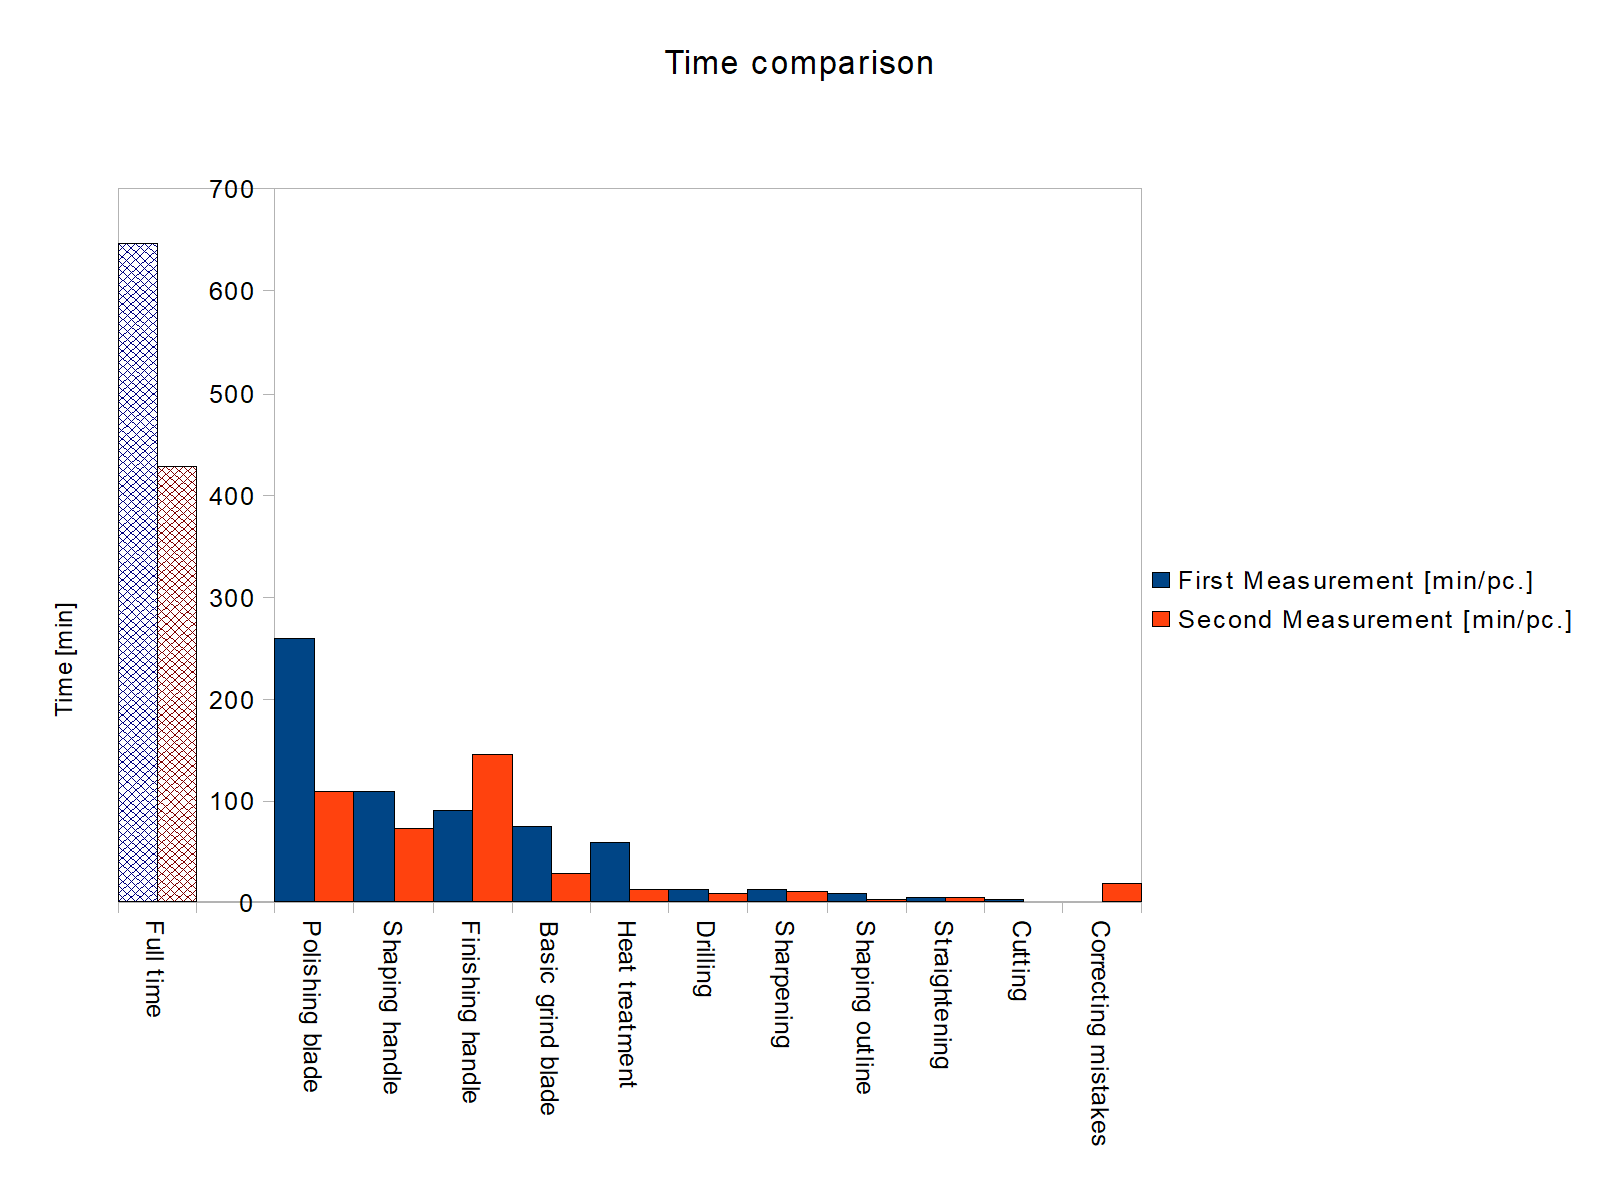
The results are in, and there is not too much to say. First, a picture that is worth a thousand words:
© Charly, all rights reserved. Click for full size.
As you can see, I have indeed reduced the time needed to manufacture a knife by working in bulk, but only partially. The biggest time-saving was in the polishing of the blade, and that was mostly achieved by changing the method from manual polishing to mirror-polish, to satin-finish with the tumbler.
Where I have saved time by working in bulk, was in the basic grind of the blade – here has also significantly helped the magnetic jig that I have later improved again – and later on in heat treatment – here I did save a lot since I did not have to wait for the forge to heat-up and I only had to prepare everything once.
The small savings in other steps are “nice to have” but they are mostly insignificant. What I have to concentrate on now is the 20 minutes time per piece that I have spent correcting various mistakes, like re-grinding curly blades etc, and the nearly an hour that my workload grew for finishing the handles. But I think there I can only significantly save time by working with resin stabilized wood, which is not possible for all the woods involved (oak, jatoba, black locust), but could significantly help with the semi-decomposed wood that turned out some really beautiful pieces.
The overall time reduction of nearly three hours is nothing to sneeze at. Plus, it would probably be even better had I really worked on this consistently from start to finish and not with various interruptions over the span of over a year.
From this point onward I won’t write about this project in detail, but I will continue to take time measurements and trying to optimize my manufacturing process some more.

Oliver Optic. The Dorcas Club, or Our Girls Afloat. Boston, Lee and Shepard, 1902.
This time I have decided not to make my own design, I took one from my mother’s stash.
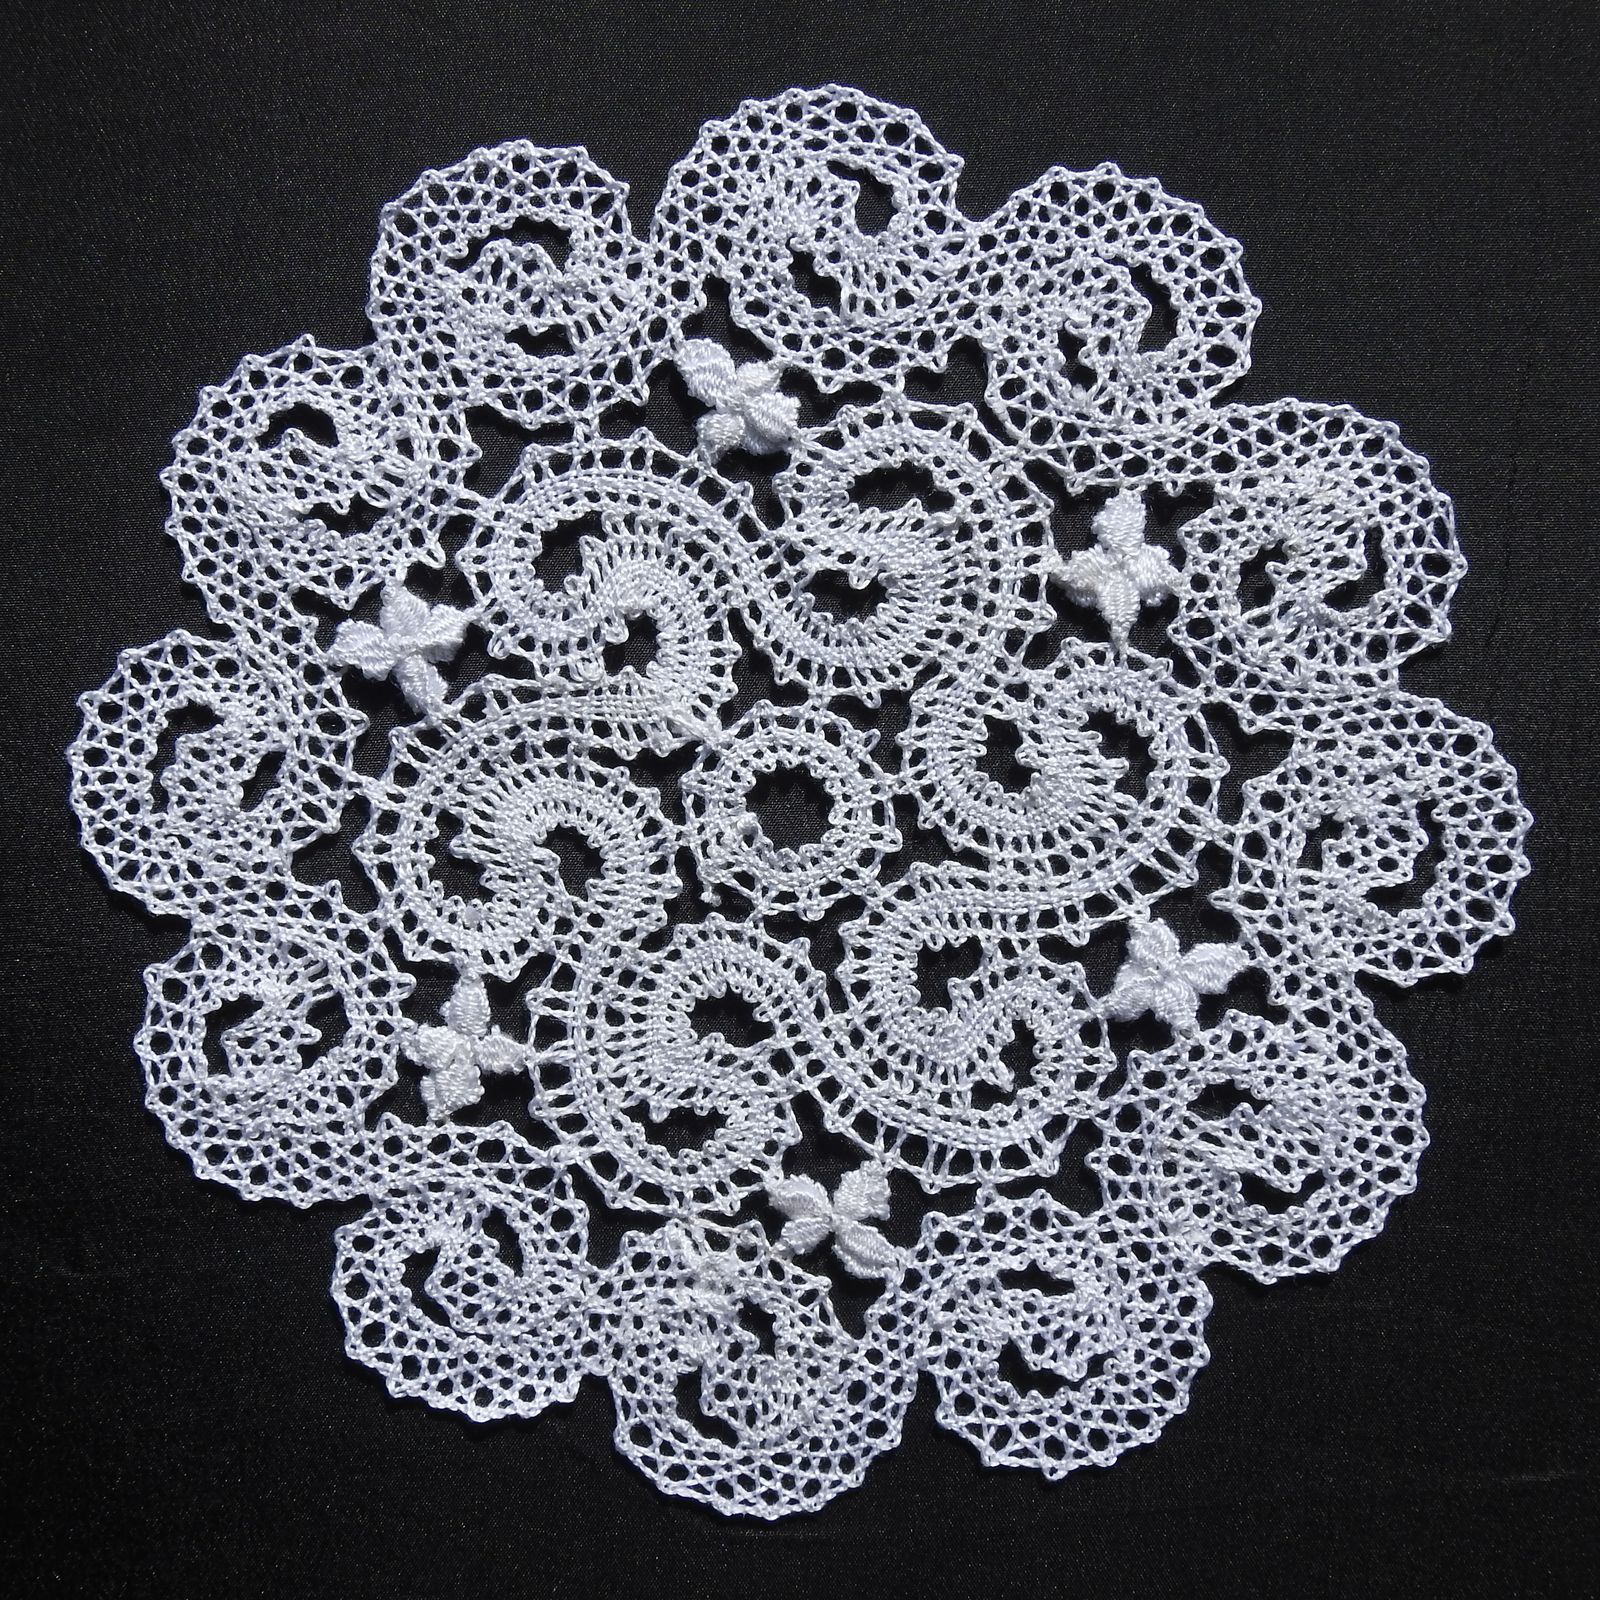
© Charly, all rights reserved. Click for full size.
Today a show that a woman who puts her mind to it can indeed weld better than many a man, certainly better than me.